Bedifferent
Old man on a bike
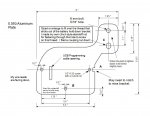
Anyway, I started all over again and here is a post of the final bracket drawing and a picture of the install tucked neatly away between the battery and the fender. In the end, I sold my PDM60 on Ebay and bought the latest version of the power distribution module from Rowe Electronics. The latest version is called the “Amplink”. They still offer the PDM60 which is less money. The Amplink has the same exact footprint as the PDM60, a lot more features and it can be programmed with an app on my phone using a Bluetooth link instead of a USB cable and a laptop.
Basically, you can now set power delay on and off times for each of the 6 individual circuits. There is a dedicated always powered "on" wire for hooking up to a small charger to charge your battery. They have added two more trigger wires for a total of three that can be used to switch circuits on or off using either positive power or a ground switch. No more LED circuit lights on the device (except for the Bluetooth “on” indicator) You can now see which circuits are active on the phone app. That is just a little bit about it.
FYI..The drawing of the bracket I uploaded here is a “.jpg” and will be difficult to duplicate full size. The important measurement is the 3 ½" between centers of the module holes. If that distance is correct on a printout, then the template will be the proper size “assuming” (there is that word again) you have maintained the proper aspect ratio of the drawing on your printout. If you are interested in making the bracket, then email me at.... winddeflectors@charter.net and I will email you a “.pdf “ file that will print out the correct size without any fuss or issues. The forum does not allow uploading and posting of “.pdf” files or I would have posted it here.
My original old disaster link if interested ...


PDM60 Installation Location and Electric Gear Outlet R3T
Edit...By the way, I had to fabricate a special nut for lower stud sticking through the bracket. I used a coupling nut I cut in half and filed the end down. I finished the shoulder and made it round on my drill press. Pictured


Last edited by a moderator:

 - You have a PM on its way.
 - Allowed to fall of benches? . Erm