Which saddlebags to use with easy brackets??

@1K9 Great....thanks. No 'saggy bags' without the frames?

Eventually they all sag, specially the top cover. They sell a kit to stiffen the bags for 40$ Mine look like hardly used and stayed inside. Look new after 10 years. I have never used them. Just don't treat then like an ice cooler. They are not supposed to take more than 10 or 12 pounds. Rain gear and an extra layer of clothes, just in case.
 
A forum member @Sidecar Flip makes inner lining kits and offers a refurbishment service via his online site
Flipmeisters Speciality Products
Signature Products | Flipmeisters Specialty Products

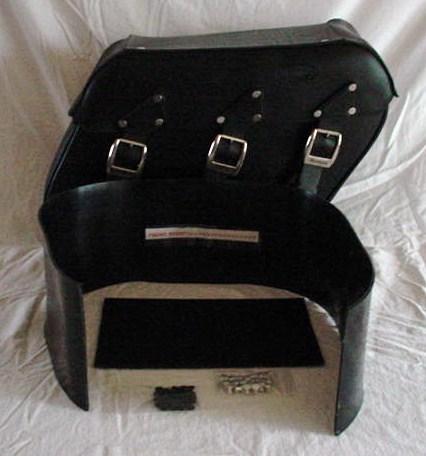
Pannier Liners/Stiffeners with BLACK specialty fasteners

Take the sag out of your bags The kit (for 2 Panniers) consists of 2 Peripheral Liners and 2 Lid Liners made from 0.125” Virgin High Density Polyethylene, heat formed to the exact shape of a new (OEM) Triumph Leather Pannier. The kit also comes with 24 Specialty Fasteners in black and complete step-by-step instructions.

Price: $ 50.00


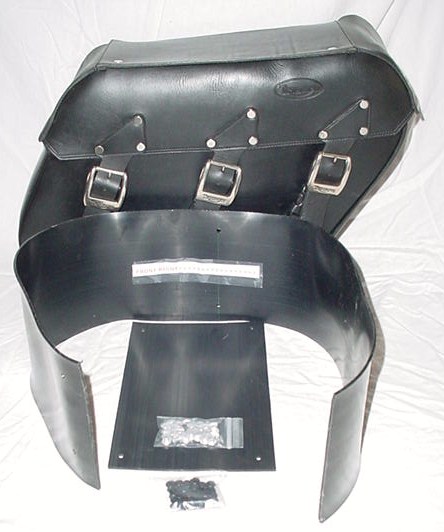
Pannier Liners/Stiffeners with SILVER specialty fasteners

Take the sag out of your bags The kit (for 2 Panniers) consists of 2 Peripheral Liners and 2 Lid Liners made from 0.125” Virgin High Density Polyethylene, heat formed to the exact shape of a new (OEM) Triumph Leather Pannier. The kit also comes with 24 Specialty Fasteners in silver and complete step-by-step instructions.

Price: $ 50.00


Pannier Reconditioning Service / Pannier Liner/Stiffener installation

Flipmeisters is now offering a Pannier reconditioning service and/or liner/stiffener installation. Whatever service you choose, you are responsible for the shipping charges & insurance both to Flipmeisters Specialty Products, LLC and return shipping charges to your address.

Basic installation of liner/stiffener kits start at $25.00 (includes reconditioning if purchased in conjunction with the liner/stifener kit). Note: additional services such as, but not limited to leather repairs, snap replacement, rivet setting and neatsfoot oil waterproofing/buffing are available at additional cost. for further information and a price quote………

Please contact me (Flip) at sales@flipmeisters.com for specific pricing and service availability.

Price: $ 0.00
 
IMG_0197.JPG IMG_0198.JPG
So I installed the easy brackets. Nice set up although I did have to move the bags forward a little because the brackets didn't match up with the front angle of the triumph bags. I imagine this probably isn't an issue with most bags. So worst thing is maybe the passenger will have them closer to their legs but I usually ride solo so don't really care. But really nice to be able to remove them without any hassle.
So any suggestions on what to do or use to 'plug' the old holes in the bags?
Nuts and bolts....rubber washers...???
 
Is that really where you attached them as the photos show? Why? That would surely position the tops of the saddlebags too high and moving the bags further back from the shocks and passenger legs.
 
Is that really where you attached them as the photos show? Why? That would surely position the tops of the saddlebags too high and moving the bags further back from the shocks and passenger legs.
No I moved the brackets back. That just shows where they line up with the stock mounting on the mud guard covers. You can see the outline of the stock saddlebag support brackets but those holes are just where the bag fastens to the stock brackets. In order to mount them in the stock location this is where they'd have to be. The holes in the easy brackets need to line up with the fasteners on the mudguard covers. The two key hole slots need to line up with the mounts that attach the OEM bracket to the bike. Again...providing your trying to keep them in the stock location.
And they're the same height as they were originally. Check out where the brackets are and then where they are on the back of the bags. I thought the same thing when I laid them on the back...thought they'd be high.
I'll post pic tomorrow after I'm finished with the install.
IMG_1635.JPG
 
Got myself a pair of quarter circle Viking bags for an upcoming trip to South Australia. I have used Easy Brackets to attach them in lieu of the Viking hardware (which is kinda awkward IMHO) as I prefer to leave the bags off the bike when they're not needed.

20170803_103020 (3).jpg 20170803_103004 (3).jpg 20170803_102944 (2).jpg
 
OEM or TORs exhaust suck for pannier clearance!
I also use some .050 aluminum diamond plate for backing to keep the panniers perpendicular to the roadway.
 
IMG_0554.JPG
IMG_0555.JPG
IMG_0556.JPG
IMG_0557.JPG
IMG_0558.JPG
Here are some pics of the Leatherworks 112P bags I have on my bike. Also have the Easy brackets in place. I installed a couple of stiffeners inside each bag to prevent the bags from sagging inward when loaded. Have used these bags for several years with no issues. I also had each bag fitted with a pin out so that a small lock can be used to keep the honest, honest.
 
Back
Top