rusty
Turbocharged
Here is the lowdown of getting the Throttlemeister to work with Kuryakyn grips.
Just as I had thought, with a little bit of work, they are (can be made) compatible.
The Throttlemeister comes with different length spacers that are about 5/8" diameter and some shims which are used to position the weights "off" the handle bar ends at a distance that allows the Throttlemeister cam to operate properly (drive into the grip end with force when applied). The instructions specify how to stack these shims for the installation.
There are a couple of issues in getting these components (Kury grips and TM) to work together and we’ll discuss as we go through the process I experienced.
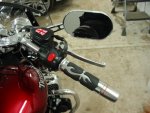
First, getting the left side grip off is not too challenging. A little twisting & a few beers did the trick. The stock throttle grip can be "peeled" off the throttle sleeve, kinda like peeling a condom off before the blood has dissipated from the excited area. The remaining stock plastic sleeve has various nibs molded on it which assures the stock rubber grip "never" spins on the throttle sleeve. These nibs need to be removed to allow the replacement grip to slide on. A utility knife with a new blade worked great for me. The 4 larger nibs on the outer end are thicker & I took them off a little at a time, kinda like whittling. These nibs need to be "cleanly" removed. If there are any rough spots left behind, they will hinder the installation of the new grip, which fits extremely tight. Now it’s time to "push" the new throttle grip onto the throttle sleeve. This can be tricky. You’ll need to try to keep the sleeve & grip wet to get that "sliding" action needed. I used water but it didn’t work too well. I didn’t want to use anything that might cause deterioration of the "high dollar" rubber grip (such as WD40, etc.) I would push the grip up the plastic sleeve and in turn, the rubber of the grip would drag and want to suck down inside the metal part of the grip. To counter this reaction, I would push the grip up about 1/8", pull it back a smidgen to straighten the rubber inserts, and go again. It took about 20 minutes to install just the throttle grip on the sleeve but when complete, I know it is not going to walk around the plastic sleeve during use (no nibs needed to hold this baby). NOTE: Be certain to start the grip on the sleeve in the orientation you want to see it as you are setting on the bike looking at the grip. I bought the "Flame" grips so I wanted to see the flame design as I sat in the saddle. You will not be able to spin the grip around to change its position after it is in place. I guarantee it!
Next, the Kuryakyn grips are about 1 inch longer than the stock grips, so the clutch & brake lever housings must be loosened and slid "up" the bars the proper mount. This adjustment needs to be very specific for the throttle side due to the Throttlemeister application. If you study the throttle sleeve closely, you will find it has some axial free play (it slides up and down the handle bar length about 1/16 inch or so). The Throttlemeister will push against the end of the Kuryakyn grip and compress it against the end of the handlebar causing it (the throttle) to lock in place (open throttle). I adjusted the throttle side to where you could just tell it was not tight against the handlebar end when relaxed, but when you pushed it up the bar to check the axial free play, the grip would come into contact with the handlebar end. This assures that when the Throttlemeister is set, it pinches the end of the grip against the end of the handlebar.
In addition to this, the Kuryakyn grips have a thick end (about ½" to 5/8") on the metal casting. This "thick" area has a hole in it which is about 5/8" diameter. In order for the spacers to pass through this hole & sit on the end of the handlebar, one of two things need to change. Either the hole in the grip needs to be made larger (YOU BETTER DO THIS BEFORE INSTALLING THE GRIP ON THE THROTTLE SLEEVE), or the "long" spacer needs to be turned down to about ½" diameter. I chose the latter. NOTE: If you don’t get enough clearance between the hole in the grip & the spacer diameters, you could get and interference (dragging feeling) when twisting the throttle, due to potential concentricity misalignment. Make certain (if possible) that the long spacer sits flat on the end of the handlebar. I’m not certain but there may be a weld bead there to deal with (holding the "plug with the threaded hole" in the bar end).
Adjusting the Throttlemeister isn’t too bad. I found that I had enough shims per the instructions to do the throttle side accordingly. I took all the other shims and put them on the left side weight just to have them with me in case I need to make any adjustments to the throttle side while out on the road (need a 4mm allen wrench with you to adjust). You will need to adjust the clutch housing so that the left side weight can be installed completely as well (not too tough to figure out). Also, the Kuryakyn grips come with glue to "bond" the left side grip onto the handlebar. Your chances of getting this grip back off in one piece is nil. So, I made sure that as I tightened the weight screw on the left side, it "smashed" (pressed might be the better word) the grip against the clutch lever housing to keep this grip from spinning around the bar while riding. I also stumbled across this little trick. In another thread some stated that dish soap on the handlebar would keep a rubber grip from spinning around. I was thinking that in a downpour, a Rocket with bubbles emanating from the grip could look kinda silly so I took another approach. I took my block of bees wax (the same one used for rubbing on dresser drawer bottoms and in window tracks for sliding freedom) and rubbed strongly against the exposed handlebar surface. If you rub lightly, the wax block just slides across the chrome face, but if you use some force, the wax actually sticks firm to the handlebar. Now when the grip is pushed on (no lubrication needed), it also adds to the "stick-a-bility" of the grip. I’m certain my left grip, with the bees wax and the compression concept of the weight, is going no where, but can be removed as needed later.
ADVANTAGE: I had installed the Rivco handlebar risers, which means I had to use the "piece of sh!t" brake line "Y" relocator. This "piece of sh!t" bracket positioned the brake line "Y", at the bottom of the triple tree, to where it would hit the radiator cover as the fork went full right (did I mention this bracket is a piece of sh!t?). By sliding the brake housing "up" the handlebar due to longer grips (moving the master cylinder closer to the forks), I gained enough brake line length I was able to eliminate the "piece of sh!t" bracket & get back to normal.
There is another comment I’m going to make in the thread about the Rocket Centerstand that has to do with front brake lines, so, if you are considering the centerstand, please review the comments there. If anyone is interested in more detail (what the hell have I left out?), PM me & we’ll chat.
Now my fingers need a rest, so, I think I’ll go "soak-em-n-sider"") .
.
See ya.
Just as I had thought, with a little bit of work, they are (can be made) compatible.
The Throttlemeister comes with different length spacers that are about 5/8" diameter and some shims which are used to position the weights "off" the handle bar ends at a distance that allows the Throttlemeister cam to operate properly (drive into the grip end with force when applied). The instructions specify how to stack these shims for the installation.
There are a couple of issues in getting these components (Kury grips and TM) to work together and we’ll discuss as we go through the process I experienced.
First, getting the left side grip off is not too challenging. A little twisting & a few beers did the trick. The stock throttle grip can be "peeled" off the throttle sleeve, kinda like peeling a condom off before the blood has dissipated from the excited area. The remaining stock plastic sleeve has various nibs molded on it which assures the stock rubber grip "never" spins on the throttle sleeve. These nibs need to be removed to allow the replacement grip to slide on. A utility knife with a new blade worked great for me. The 4 larger nibs on the outer end are thicker & I took them off a little at a time, kinda like whittling. These nibs need to be "cleanly" removed. If there are any rough spots left behind, they will hinder the installation of the new grip, which fits extremely tight. Now it’s time to "push" the new throttle grip onto the throttle sleeve. This can be tricky. You’ll need to try to keep the sleeve & grip wet to get that "sliding" action needed. I used water but it didn’t work too well. I didn’t want to use anything that might cause deterioration of the "high dollar" rubber grip (such as WD40, etc.) I would push the grip up the plastic sleeve and in turn, the rubber of the grip would drag and want to suck down inside the metal part of the grip. To counter this reaction, I would push the grip up about 1/8", pull it back a smidgen to straighten the rubber inserts, and go again. It took about 20 minutes to install just the throttle grip on the sleeve but when complete, I know it is not going to walk around the plastic sleeve during use (no nibs needed to hold this baby). NOTE: Be certain to start the grip on the sleeve in the orientation you want to see it as you are setting on the bike looking at the grip. I bought the "Flame" grips so I wanted to see the flame design as I sat in the saddle. You will not be able to spin the grip around to change its position after it is in place. I guarantee it!
Next, the Kuryakyn grips are about 1 inch longer than the stock grips, so the clutch & brake lever housings must be loosened and slid "up" the bars the proper mount. This adjustment needs to be very specific for the throttle side due to the Throttlemeister application. If you study the throttle sleeve closely, you will find it has some axial free play (it slides up and down the handle bar length about 1/16 inch or so). The Throttlemeister will push against the end of the Kuryakyn grip and compress it against the end of the handlebar causing it (the throttle) to lock in place (open throttle). I adjusted the throttle side to where you could just tell it was not tight against the handlebar end when relaxed, but when you pushed it up the bar to check the axial free play, the grip would come into contact with the handlebar end. This assures that when the Throttlemeister is set, it pinches the end of the grip against the end of the handlebar.
In addition to this, the Kuryakyn grips have a thick end (about ½" to 5/8") on the metal casting. This "thick" area has a hole in it which is about 5/8" diameter. In order for the spacers to pass through this hole & sit on the end of the handlebar, one of two things need to change. Either the hole in the grip needs to be made larger (YOU BETTER DO THIS BEFORE INSTALLING THE GRIP ON THE THROTTLE SLEEVE), or the "long" spacer needs to be turned down to about ½" diameter. I chose the latter. NOTE: If you don’t get enough clearance between the hole in the grip & the spacer diameters, you could get and interference (dragging feeling) when twisting the throttle, due to potential concentricity misalignment. Make certain (if possible) that the long spacer sits flat on the end of the handlebar. I’m not certain but there may be a weld bead there to deal with (holding the "plug with the threaded hole" in the bar end).
Adjusting the Throttlemeister isn’t too bad. I found that I had enough shims per the instructions to do the throttle side accordingly. I took all the other shims and put them on the left side weight just to have them with me in case I need to make any adjustments to the throttle side while out on the road (need a 4mm allen wrench with you to adjust). You will need to adjust the clutch housing so that the left side weight can be installed completely as well (not too tough to figure out). Also, the Kuryakyn grips come with glue to "bond" the left side grip onto the handlebar. Your chances of getting this grip back off in one piece is nil. So, I made sure that as I tightened the weight screw on the left side, it "smashed" (pressed might be the better word) the grip against the clutch lever housing to keep this grip from spinning around the bar while riding. I also stumbled across this little trick. In another thread some stated that dish soap on the handlebar would keep a rubber grip from spinning around. I was thinking that in a downpour, a Rocket with bubbles emanating from the grip could look kinda silly so I took another approach. I took my block of bees wax (the same one used for rubbing on dresser drawer bottoms and in window tracks for sliding freedom) and rubbed strongly against the exposed handlebar surface. If you rub lightly, the wax block just slides across the chrome face, but if you use some force, the wax actually sticks firm to the handlebar. Now when the grip is pushed on (no lubrication needed), it also adds to the "stick-a-bility" of the grip. I’m certain my left grip, with the bees wax and the compression concept of the weight, is going no where, but can be removed as needed later.
ADVANTAGE: I had installed the Rivco handlebar risers, which means I had to use the "piece of sh!t" brake line "Y" relocator. This "piece of sh!t" bracket positioned the brake line "Y", at the bottom of the triple tree, to where it would hit the radiator cover as the fork went full right (did I mention this bracket is a piece of sh!t?). By sliding the brake housing "up" the handlebar due to longer grips (moving the master cylinder closer to the forks), I gained enough brake line length I was able to eliminate the "piece of sh!t" bracket & get back to normal.
There is another comment I’m going to make in the thread about the Rocket Centerstand that has to do with front brake lines, so, if you are considering the centerstand, please review the comments there. If anyone is interested in more detail (what the hell have I left out?), PM me & we’ll chat.
Now my fingers need a rest, so, I think I’ll go "soak-em-n-sider"
.See ya.
Last edited: