And as Warp says, we have all learned about the dreaded Detorats eating pistons and things..............:(
Ya them detorats can be some buggers with incisors so strong that you need new liners :( Don't ask me how I know :)
This is why no matter how much you want forced air because its right out there in your face!!! Its just sometimes safer and cheaper to stick with NA motors especially when they handle the differences from station to station in the apparent octane of the fuel verses the advertised octane !!!!!!
The you got the nutters that mix both styles of achieving horsepower!!!!!!!!!
 
The OEM hole in the nose is 8 mm for the retaining bolt for the cam drive sprocket. The blower hole is 12 mm.

TTS supply a taper tap AND a bottoming tap to thread the new hole.

And as Warp says, we have all learned about the dreaded Detorats eating pistons and things..............:(
Trouble is if you do not drill to correct depth and use taps square and in the right order first /second and plug you can supply want you like I do not think the average guy is going to do a good enough job
Forgetting tap lube /correct method of using taps all things learnt in your early years of toolmaking
Sorry someone spent a long time in engineering and pissed off
Your absolutely correct I remember telling Richard about designing some drill and tap guides when I did mine to make it easier for those who weren't machinist. I am not sure when he implemented it but it was a good idea. They were not available when I did mine and I wish I would have took the time to make some. Instead like a machinist I step drilled mine to aid in keeping alignment, and bought a starting tap to help before I went with the plug and bottoming supplied with the kit. (all three taps are better when drilling and tapping a blind hole) Of course by that time I had been running machines for 32 years and had a good idea on what to do. Still I maintain that no matter how much experience one has without guides there is still a amount of luck involved when using a hand drill. Just as important is cleaning out the chips while your are tapping so you get as deep as you drilled. And you are right proper cutting fluid is the key to not tearing threads which will weaken them or change the class of fit. ( I went for a 3B fit)

Or at least that's my excuse :)

As stated in my above post and I will say it again in a different way. One should only build the engine within the ability of being able to work on it if you have a burp. By this I mean if your across the country from where your Forced Air kit has been built and lack the ability to sort things out you should realize how expensive it would be to ship it clear across the country to have it sorted out. The same goes for a NA kit its just forced air is a little more tricky to sort out then NA. Either way this should be a consideration no matter what the build it.
I love this forum but would love to talk face to face with some of the guys :)
 
Everywhere in Oz is close to Perth, you can't get more than about four thousand kms away......:)
Ya I am guessing he is about 40 miles from Perth I think down south near Waikiki. Anyway My wife promised a trip to my daughter when she graduates High school. She want to go to London or where ever the Beatles paraphernalia is. I figure instead of gloomy weather it would be the perfect time for me to take a trip down under :D
 
Good stuff, My brain is starting to visualize this bike from the inside, in fact I should buy a wreck just to cannabalize the motor, the only way to learn is roll up them sleeves and get dirty.
 
I love this forum but would love to talk face to face with some of the guys :)

Your not far from me so if you have any troubles give me a call.

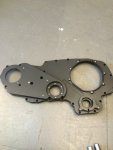
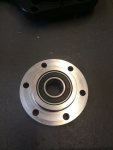
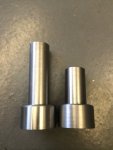
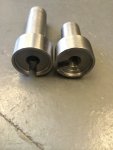
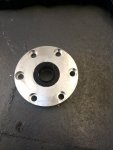
regarding drilling the crank. With our latest kit we have covered it very well. You drill a 6.5 mm pilot hole down the centre of the crank using the 8mm threaded hole to get the hole to the required depth.You bolt the main TTS case to the engine, push the first unthreaded guide through the outrigger bearing which is in the separate housing. You press the guide up against the crank and put 3 locating screws into the bearing housing to ensure the guide doesn't move. Then drill the crank with the 10.8mm drill. Remove the bearing housing fit the threaded guide, locate back on the crank and hold the bearing housing to the main plate with the 3 screws again, lube the taper tap and cut the thread, remove the tap and go down with the plug tap. Job done. Clean it all out and your ready to assemble.
 

Attachments

  • photo 5.JPG
    photo 5.JPG
    226.8 KB · Views: 4
  • photo 1.JPG
    photo 1.JPG
    186.5 KB · Views: 5
  • photo 2.JPG
    photo 2.JPG
    213.7 KB · Views: 5
  • photo 3.JPG
    photo 3.JPG
    207.7 KB · Views: 5
  • photo 4.JPG
    photo 4.JPG
    251.6 KB · Views: 5
Your not far from me so if you have any troubles give me a call.

regarding drilling the crank. With our latest kit we have covered it very well. You drill a 6.5 mm pilot hole down the centre of the crank using the 8mm threaded hole to get the hole to the required depth.You bolt the main TTS case to the engine, push the first unthreaded guide through the outrigger bearing which is in the separate housing. You press the guide up against the crank and put 3 locating screws into the bearing housing to ensure the guide doesn't move. Then drill the crank with the 10.8mm drill. Remove the bearing housing fit the threaded guide, locate back on the crank and hold the bearing housing to the main plate with the 3 screws again, lube the taper tap and cut the thread, remove the tap and go down with the plug tap. Job done. Clean it all out and your ready to assemble.
Nice improvement Richard I really like how you also beefed up the bearing for the drive unit. I have a older style housing with the change over to the roller bearing (small size and old style crank drive. I wish you made these changes before I sent for a new one as I have always worried about the small ball bearing. I would say your right about the constant improvement!!!!!! DO you mak ethis style with the manual cable clutch system or does everyone have to change over to hydraulics?
 
Back
Top