First I want to thank all of the members of this board for their suggestions, ideas, and support. I especially want to thank Paul Bryant for sending me instructions and pictures of what he did to fix his bike when he had a similar problem.
I have made a friend at the church I joined who rides and is a mechanical engineer with a lot of experience. I had him read this thread and what Paul suggested.
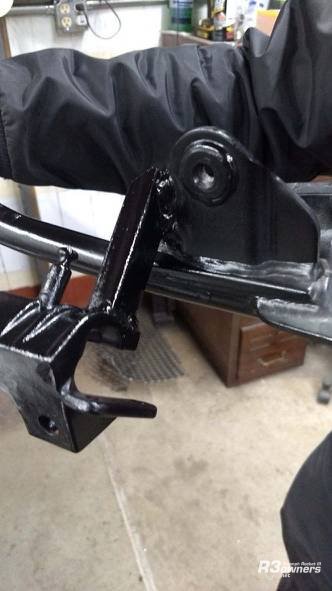
In looking at this together, we realized that a brace could be welded between a flat area on the top of the kickstand and the back of the bracket for the shifter which sits on the floorboard rail. The brace is only about 2.75 inches long. We used some "C" steel. He cut an approximate length of steel and then used a grinding wheel to get the angle right for the back of the shifter bracket.
Before we started fitting the brace to the kickstand bracket and the back of the shifter bracket, he used a drill press to drill out the threads of the broken pieces of the crankcase. We applied JB Weld between the pieces and the crankcase. Using 2 longer bolts and the one undamaged bolt, we bolted the kickstand bracket to the crankcase in order to apply pressure to the crankcase pieces and gave them time to set. We did all of this on the first day, a Saturday. The bike was sitting on the homemade lift, talked about on this board, which is made our of 2x8's which are cut in half and screwed together to make a 4x8 and a 3/4 inch galvanized rod and flange are used as a lever to lift the bike.
The following Saturday, we took the floorboard and shifter off of the rail and then removed the rail from the bike. Using a MIG welder. He would put a spot weld on the brace and the top of the kickstand bracket. We would then check for fit. We kept doing this until we had the brace welded to the top of the kickstand. We then started the same process with the back of the shifter bracket until it was all welded to the brace. I then painted the parts. After the paint dried we reattached everything. At this point the kickstand was being supported by the one undamaged bolt and the brace between the kickstand bracket and the shifter bracket. We let the bike down onto the kickstand and it was very solid. This was the end of the second day.
The following Saturday, I then went to deepen the holes that were damaged. The whole week the bike was resting on the kickstand without any difficulties. I took off the shifter, the rail, and the kickstand bracket. I had 30mm long socket head bolts to use instead of the stock 25mm long bolts. I also had a bottom tap to add additional threads.
In looking at the kickstand bracket, the depth of the bracket is 9mm where the bolts go through the bracket. This means the previous bolts were only 16mm into the crankcase bosses. This meant the longer bolts would go 21mm into the crankcase. This would leave 7mm of material available before going through the wall of the crankcase. What I did was use a nut on the tap to keep from going beyond this depth. I would take a little material out of the hole, using the dip stick of for the engine oil to use the engine oil as a lubricant. I would clean out the hole with an air hose, thread in the bolt, and then measure the distance between the underside of the bolt and edge of the hole where the bolt goes in. When the distance was just less than 9mm I stopped. I did not go through the crankcase and added some additional support for the kickstand. This was probably unnecessary, but it made me feel better.
Time will tell how well this solution works, but for now it appears to be a rather simple yet effective fix.