What do you think?....Hand wind deflectors

Bedifferent

Old man on a bike
Joined
Dec 11, 2014
Messages
1,815
Location
Coldwater, MI
Ride
2015 Rocket 3 Touring
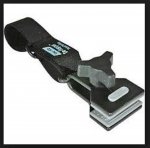
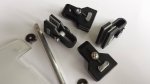
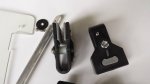
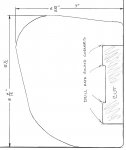
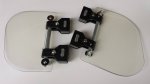
I'm at it again....I've seen some pretty ugly wind defector for helping to keep your hands warm here on the forum. I made these using some Camco RV Awning De-Flapper Brackets (the knobs were not used), some 1/2" round aluminum rod, and an old windshield I had laying around. I actually thought I had a piece of 3/16" polycarbonate that I could use for the deflectors, but not so. Using the old Harley windshield meant it has a little curve to the design.

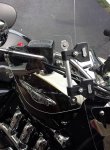
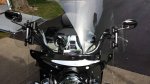
I think these actually look really sharp on the bike and are barely noticeable except for the clamps. The clamps kind of negate the overall height of the windshield and add kind a mechanical look to the bike. At highway speed they dramatically reduce the air flow around your hands making them a great add on for cold weather and in the rain. The top edges of the deflector just rests against the mirror mounts eliminating any minor flexing and movement. They can be adjusted up and down easily and can be removed in less than a minute as I designed them to simply clamp to the windshield. With all that said, I like them so well I may drill a small hole through each De-Flapper clamp mount, making them a permanent part of my windscreen.

I have a little more fit and finish work to do and I will do another post with more details pictures about how I made them if anyone is interested.

Since I have decided to go back to a windscreen on my bike, I think my R3T Corbin Fairing will be going up for sale in the near future. New England White and black in case anyone is interested. I am going to try and sell it for local pickup first.
 

Attachments

  • image.jpg
    image.jpg
    131.1 KB · Views: 12
  • image.jpg
    image.jpg
    407.9 KB · Views: 12
  • image.jpg
    image.jpg
    303.7 KB · Views: 12
Very nice job looks great! That's on my short list for sure!! Do you have a part # for those clamps?

Thanks! Most RV places carry them...quite frankly I bought them from Walmart. Pretty much a standard stocking item for Walmart. I'm going to post some plans, more pictures and how to soon.
 
As I mentioned in my post I would show more pictures and some notes on how to make these windshield add on deflectors...so here it is. I couldn't decided if I wanted to post them here or start another thread, so I guess I'll just put the information here. I used stainless steel screws and washer in the whole project unless otherwise noted.

2 sets of Deflappers @ $10 for each pair....$20
1 1/2" X 3 ft aluminum rod @ $7
4 1/4-20 X 1 1/4" button head screws to replace the Deflapper knobs
4 10-32 X 3/4" button head screws to mount the plastic to the rod
4 8-32 X 3/8" set screws
4 fender washers for mounting on top of the plastic
4 1/4" washers under the 1/4-20 screws
4 10-32 chrome acorn nuts @ $1.49
4 1/2" long X 1/2 diameter 1/4" hole nylon spacers
3/16 polycarbonate plastic

First of all, I cut the aluminum rods to a length of 7". I then made a V block fixture (see picture) for clamping and holding the rods so I could cut the flats the same on both ends. I used my table saw to do this. Do whatever you must to create the flats on the rod. The flats are 1" long and are cut to around the centerline of the rod. I drilled at the mid point of each flat and tapped the hole for the 10-32 button head screws. These holes could have been drill through for the screws as well and fastened with the acorn nuts or nylon locking nuts.

I cut off the strap loops on each Deflapper and drilled each Deflapper on the underside "as shown" for set screws. I drill and tapped these for the 8-32 set screws to help lock the rod in place. The rod actually locks really tight when the clamp is fastened so you could probably get away with not having the set screws at all. Note: I bought some 1/2" long nylon washers with a 1/4" hole and cut them down to about 7/16" long. I made another fixture for precisely doing this on my table saw, but you can figure out another way if needed. I put this nylon washer in the center of the clamp between the two halves of the Deflapper ( see picture ). This is to prevent over tightening the clamping screw. Over tightening the screw can cause the plastic clamp pads (in spite of it being quite rigid) to flex to much. You have to experiment with this to get it just right. I cannot see them slipping off your windshield if you get it right. They hang on very tight.

I traced around the pattern "as shown" ( you can design your own if you like of course ) and cut out the polycarbonate deflectors. I drilled each defector to match and line up with the holes on the assembled deflector mounts. Notice, the distance between the inside edges of the deflector is just a hair under 5"....as that is what you have for distance on the rod after the 1" flats are cut on each end. If you use the picture included here and print it out so the dimensions are correct you will have a pattern to use for the deflectors. Also shown below is the front and backs of the finished product.

Except for rounding the ends of the rods slightly, buffing the fender washers up a bit and putting it all together, that is about it. This is not a difficult project to make and if I could figure out a quicker and cheaper way to make them, I would almost consider making some and trying to sell them. Anyway...enjoy
 

Attachments

  • image.jpg
    image.jpg
    108.2 KB · Views: 8
  • image.jpg
    image.jpg
    215.6 KB · Views: 8
  • image.jpg
    image.jpg
    296.2 KB · Views: 8
  • image.jpg
    image.jpg
    166.7 KB · Views: 8
  • image.jpg
    image.jpg
    124.5 KB · Views: 9
  • image.jpg
    image.jpg
    84.2 KB · Views: 9
Back
Top