Don't think aluminum will have the hardness needed, the tool only grabs the very edge of the bucket. I think aluminum is to malleable to have that much pressure on such a small area. Regular steel would certainly work. As I mentioned in the original plans, I used stainless cause' I work in a food plant and have mucha stainless scrap.
That is highly possible Fred. I have some pretty tough alloy that might work, but the edge might be an issue over time as you mentioned. I'm still looking around for some other options I could use to make them. Some 1 1/2" angle would certainly be a option. I do have a small MIG welder and it almost might be less work to make it in three pieces instead of cutting it out from one piece. Making a jig to align the pieces might be easier.
I did make one out of stainless, but as I mentioned... mass production would be a nightmare cutting from stainless. Even rough cutting and leaving all the filing work to someone else would be a pain. I still have the top plate to make for it and of course some tweak bending before using.
My question is.... Do you depress the valve bucket with the tool by tightening the bolt or do you use the cam to depress the valve and then allow the valve to come back up and rest against the end if the tool after it has been tightened down?
Based on the other videos, I'm pretty sure it's the latter: use the cam lobe to depress the valve, install the tool, and rotate the cam away, leaving a gap enough to remove and replace the shim.
Based on the other videos, I'm pretty sure it's the latter: use the came lobe to depress the valve, install the tool, and rotate the cam away, leaving a gap enough to remove and replace the shim.
As I suspected, but I thought I would ask. I got to wondering about I as I was making the tool. It just made more sense that would be the way you would want to do it.
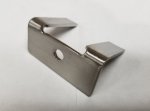
The dimensions aren’t all that critical. The tool I build looks like a drunk teenager made it, doesn’t matter, still works.
1/2” width doesn’t matter, it only matter that it fits within the head and the area between the legs is wide enough. Alu will never make the required bend radius without snapping.
The tool I made isn't pretty also but it works. It seemed I spent more time making and fidgeting with the tool than replacing the shims. I had 7 valves to adjust. I quickly learned to depress the valve with the cam before installing the tool, then role the cam back to remove shim. One of the biggest pains was making sure that the shim access slot in the bucket stayed in an accessible place so that I could lift the shim with a small bent screw driver. The first couple of shims to remove were painful but as I got some practice, things went quick. The last 2 shims were removed and replaced in about 10 minutes. One took me over an hour. The trick is to be patient.
You need to make the tool stiff enough so that it doesn't flex and slip off the shim bucket. There isn't a lot of material to hold onto that's why the rounded tangs and beefy construction on the manufactured removal tool Ishrub posted, look like the cat's meow.
Oh, which one of you can guess what SnapOn tool I cut up to make this? I'll give you a hint, it's from the 70s and I haven't used it for at least 20 years.
Oh, which one of you can guess what SnapOn tool I cut up to make this? I'll give you a hint, it's from the 70s and I haven't used it for at least 20 years.
That looks like an interesting fabrication job. I found some right angle concrete mounting plates that were exactly 2" wide with a right angle bend. Being a little heavier, 1/8" thick, I thought I could put a little 1" radius on the leg since the shims are 25mm. A little curve cut might sit better on the bucket lip.
Oh, which one of you can guess what SnapOn tool I cut up to make this? I'll give you a hint, it's from the 70s and I haven't used it for at least 20 years.