Seat carving

BigNorm

Boobie Inspector
Joined
Apr 30, 2016
Messages
3,430
Location
Minden, NV, USA
Ride
2014 Rocket 3 Touring
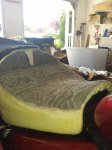
I finally gave customizing my own seat a go and so far I am happy with the results. I read everything at diymotorcycleseat.com and bought a 120 disk for my grinder, a carving knife, staple removal tool (way worth it) and an air stapler with staples. The diy articles recomend a variable speed grinder and I would recomend the same but as I do not have a variable speed grinder I used the one I had. I first marked my seat to where I thought I wanted it and cut on down with the electric knife. Then I set to rounding it out and shaping the foam with the grinder. If you ever wanted to look like Santa Clause in July this is the way to do it. This is very messy. I recommend having a canister vacuum close if you choose to do this. I smoothed the seat out and ground it as flat as I could to provide as much area as possible to have my legs help support my weight on the seat which takes some of the load off the sitting bones and tail bone. I soon discovered that the plastic hump was pushing into my tail bone. To remedy this I took a small hole saw and cut a hole in the seat pan. I took the padding almost all the way down to the pan so I used and cut a memory foam bath mat I had to fit. I trimmed a V in the back to give my tail bone a little space. I had several fittings and small adjustments until I was happy so my recommendation is that if you choose to do this just throw the cover over and test it out or you will be removing staples again and again. The last thing I noticed is that the metal bar under the seat which provides the brackets that hold on the two side screws on the touring model was poking my tail bone. I removed that and now am riding with only the rear screw to secure the seat. AHHHHH That's the spot.

I believe this is almost as perfect as I can make it. I'm considering an air hawk or some beads to help with the sweaty ass situation on hot days but the seat feels good so far. I may buy some padding and play with it more this winter but for now much much better feel than stock.
 
I forgot to add with carving the seat rearward it put my feet on the boards where I wanted them so now there is no need for me to mess with the brake peddle. I will add pics when I can. They are not with me at the moment.
 
I finally gave customizing my own seat a go and so far I am happy with the results. I read everything at diymotorcycleseat.com and bought a 120 disk for my grinder, a carving knife, staple removal tool (way worth it) and an air stapler with staples. The diy articles recomend a variable speed grinder and I would recomend the same but as I do not have a variable speed grinder I used the one I had. I first marked my seat to where I thought I wanted it and cut on down with the electric knife. Then I set to rounding it out and shaping the foam with the grinder. If you ever wanted to look like Santa Clause in July this is the way to do it. This is very messy. I recommend having a canister vacuum close if you choose to do this. I smoothed the seat out and ground it as flat as I could to provide as much area as possible to have my legs help support my weight on the seat which takes some of the load off the sitting bones and tail bone. I soon discovered that the plastic hump was pushing into my tail bone. To remedy this I took a small hole saw and cut a hole in the seat pan. I took the padding almost all the way down to the pan so I used and cut a memory foam bath mat I had to fit. I trimmed a V in the back to give my tail bone a little space. I had several fittings and small adjustments until I was happy so my recommendation is that if you choose to do this just throw the cover over and test it out or you will be removing staples again and again. The last thing I noticed is that the metal bar under the seat which provides the brackets that hold on the two side screws on the touring model was poking my tail bone. I removed that and now am riding with only the rear screw to secure the seat. AHHHHH That's the spot.

I believe this is almost as perfect as I can make it. I'm considering an air hawk or some beads to help with the sweaty ass situation on hot days but the seat feels good so far. I may buy some padding and play with it more this winter but for now much much better feel than stock.

So, did I miss something BigNorm? I thought you roasted your clutch and now you're carving your seat? Down boy, you'll run outta things to do!:eek:
 
The seat mod was always #1 on my list of things to do. The 7 hour ride home from Idaho (where I bought the bike) was brutal. I did the seat stuff last week while I was waiting on parts from CTM. The fibers are back in and I cleaned up the steels with sanding disks (gently!) There was no bluing so I reused them. Someone told me that they are cheap but there are also 9 of them. 15 dollars times 9 was someting I didn't have right now. I know I risked good money over bad but I took a gamble and they are working great so far. I really like the feel of the new fibers. It is hard to explain but they are better than stock.
 
Almost anybody's aftermarket fibers are gonna feel better than stock I reckon. The stock one's just have to work, they don't have to feel like anything special especially if you are trying to keep the selling price of the bike in the stratosphere! Some manufacturers have even used mushy springs to create a quasi back torque limiter. Tighter springs can be had for some bikes and it makes a world of difference in feel, though you do loose BTL capability...only a loss if you are downshifting at 200 mph!

And I think the same goes for seats....they make them to work OK for most folks, but not real good for anybody!
 
Last edited:
Been kicking the idea around about doing the same while taking notes from diymotorcycleseat.com.
I have a spare seat so I don't have to be in a big hurry...:p

Looking at your pictures it looks like it's going pretty smooth:rolleyes:
 
I thought I took more pictures. This gives you an idea of what I did.
 

Attachments

  • 20160701_103656.jpg
    20160701_103656.jpg
    198.3 KB · Views: 30
Back
Top