Bedifferent
Old man on a bike
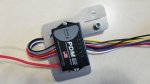
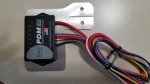
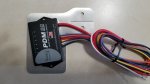
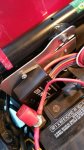
The weather wasn't too bad today so I decided to to start working on a few bike projects. I bought a PDM60 for my bike and although my wiring is nice and solid, I wanted to cleanup things and get rid of some of the inline fuses I tied to my battery, I always solder and heat shrink all my connections, plus I keep my terminal connections to a minimum by combining wires for as few terminals as possible connected to the battery.
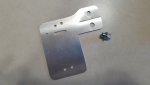
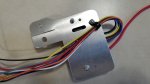
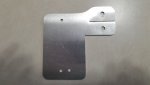
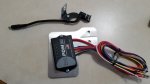
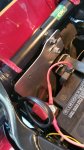
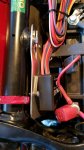
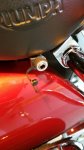
The first order of business was to decide where to mount the PDM60 and then make a mounting plate to do it. I decided on the space as shown in the pictures using a couple existing screws but I had to keep the mounting lower than I would have like because of the air intake attached to the seat. That intake on the seat extends pretty wide and deep in the battery box area thus the low mounting. All the holes and cuts in my mount serve a purpose giving me some some straight and angled mounting options plus a cut that provides some needed flex where the bracket is mounted to the bolts. The bottom bolt does not have enough threads exposed so I may have to do a thing I have in mind using a larger hole, a coupling nut through the hole, a bolt, and a large nylon washer that will fit over the coupling nut. This should allow me to draw things down tight on the bottom mount. Anyway, it looks like it is going to work in that spot an with it angled slightly on the mount I can still see the status of the lights on the PDM60. There is a lot of nice empty space in that area and it should stay pretty dry there as well.
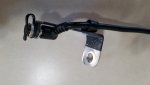
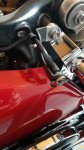
I also bought a different powerlet adapter for my electric jacket liner (which I now seldom use), and remounted it on the bracket I made and had on my total 2013 Rocket. A few tweaks and it fits perfect in the mount... resting just under the seat when mounted. It is out of the way and makes for a nice clean look. I did use my auxiliary receptacle at one time, but the plug would often work its way out and lose its connection on a ride. I may still tie the powerlet directly to the battery with a fuse as it makes for a good charging and alternate power source with the key turned off.
I am posting pictures to share ideas if you ever decide to mount a PDM60 or a powerlet for you heated gear. When I get thing all neat and tidy I will post more pictures. Lots to do yet including the RamAir, TOR's, Paul Bryant crossover, a new rear tire while I have things off, a new tune and maybe a front running light idea I have. Maybe even an AFR Gage.
Cheers
The first order of business was to decide where to mount the PDM60 and then make a mounting plate to do it. I decided on the space as shown in the pictures using a couple existing screws but I had to keep the mounting lower than I would have like because of the air intake attached to the seat. That intake on the seat extends pretty wide and deep in the battery box area thus the low mounting. All the holes and cuts in my mount serve a purpose giving me some some straight and angled mounting options plus a cut that provides some needed flex where the bracket is mounted to the bolts. The bottom bolt does not have enough threads exposed so I may have to do a thing I have in mind using a larger hole, a coupling nut through the hole, a bolt, and a large nylon washer that will fit over the coupling nut. This should allow me to draw things down tight on the bottom mount. Anyway, it looks like it is going to work in that spot an with it angled slightly on the mount I can still see the status of the lights on the PDM60. There is a lot of nice empty space in that area and it should stay pretty dry there as well.
I also bought a different powerlet adapter for my electric jacket liner (which I now seldom use), and remounted it on the bracket I made and had on my total 2013 Rocket. A few tweaks and it fits perfect in the mount... resting just under the seat when mounted. It is out of the way and makes for a nice clean look. I did use my auxiliary receptacle at one time, but the plug would often work its way out and lose its connection on a ride. I may still tie the powerlet directly to the battery with a fuse as it makes for a good charging and alternate power source with the key turned off.
I am posting pictures to share ideas if you ever decide to mount a PDM60 or a powerlet for you heated gear. When I get thing all neat and tidy I will post more pictures. Lots to do yet including the RamAir, TOR's, Paul Bryant crossover, a new rear tire while I have things off, a new tune and maybe a front running light idea I have. Maybe even an AFR Gage.
Cheers
Attachments
-
 20180322_184148.jpg137.6 KB · Views: 45
 -
 20180322_184314.jpg142.9 KB · Views: 46
 -
 20180322_184338.jpg159.2 KB · Views: 48
 -
 20180322_184636.jpg130.4 KB · Views: 43
 -
 20180322_184652.jpg126.5 KB · Views: 53
 -
 20180322_183846.jpg174.3 KB · Views: 47
 -
 20180322_185242.jpg159.9 KB · Views: 43
 -
 20180322_185253.jpg180.9 KB · Views: 46
 -
 20180322_190231.jpg159.6 KB · Views: 52
 -
 20180322_190439.jpg126.2 KB · Views: 51