Entire walkthrough of both wheel removal and installation on a 2015 R3R

@Starmanut , my pleasure!

Re: the lube, if you look like you have a ton in there already, I wouldn't bother adding much more if any. It's tough to see from here, but just use your judgement. A tiny skim of moly on the end of the male shaft might make mating them a bit easier anyway, but don't go buck nutty with it. No need I don't suspect. Now, the gears on the bevel box that mates to the gear on the wheel...that can stand a little clean up and fresh moly I bet. I did mine, and will do it every time that wheel is off.

Re your question about the shaft pulling out a bit, I suspect that it has a significant amount of travel fore and aft to accommodate the rear suspension travel. I think you're gold. Just do like I did, ease it back in there with a little lift on the rear end, and sorta "scoop" the male splined shaft up into the female receiver on the bevel box. I don't remember doing this, but I bet you could, if you can't seem to get it lined up, you could take a gloved hand and try to rotate the gear that mates with the rear wheel a little bit, which would rotate your female shaft receiver a little bit. Might just need a smidge of rotation to get lined up, but if you haven't moved anything since it was split, it should go back together just fine. Once you have it reconnected and the bolts torqued up (REMEMBER TO FOLLOW THE BOOK'S RECOMMENDATION!...it was very specific about how to torque the 4 mount bolts up in sequence. If you don't have the book, just ask here and I'll scan that page in for you), the fact that the shaft pulled out a little bit will be mitigated. It will be shoved back to the appropriate spot just by the act of reattaching the bevel box methinks.

Thank you!!!!
I do have the manual (or two) in PDF format. In fact just for the record, here's that page for the sake of others:
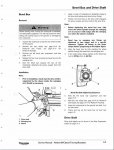
page6.x.jpg

Dunno it just threw me where is says "check that the drive shaft is supported by the sleeve inside the swinging arm". I couldn't find what it was talking about.
No worry, though. I'll just do as you have. Will do that project tomorrow. I'm tuckered.
Gotta love all the help available here!!!
 
that video looked pretty long so no look
just want to say i have heard a lot of ways to get that shaft at the correct level and i think the best one was to take a looped string and lift the shaft to center then after it is on a ways cut the string and remove it.:)
 
that video looked pretty long so no look
just want to say i have heard a lot of ways to get that shaft at the correct level and i think the best one was to take a looped string and lift the shaft to center then after it is on a ways cut the string and remove it.:)

Will it hurt to pull the shaft out a bit? Mine is sitting back in the tube about an inch or two. It would be hard to get the string around it to lift it up. And I remember you mentioning that awhile back in some other post. :)
 
i just heard about the string and thought it sounded good i have never tried to do that.
i also have never tried to pull the shaft out. i do not know if it will come out far enough to disconnect from the engine.
also just thought if u have to pull it out to get the string on then when u try to install the final drive it will push the shaft in and disconnect the string.
maybe not a good ideal.
as i recall i just wiggle the diff and it goes on.:)
 
@Starmanut , yeah, I think you'll be fine with the wiggle trick. It really only took me a few tries and it slid right on. I think the string trick is a neat idea if needed, but I bet you'll be okay.

If you're remotely concerned about your output / driveshaft being pulled too far forward (aka, you're afraid it may have disengaged from transmission, if that's possible [I have no idea, but I'd suspect there must be some c-clip or something keeping it from pulling too far forward!]), just pop the bike into gear and turn the shaft by hand. If it engages and doesn't turn while in gear, but turns free when you pop it back to neutral, I'd consider that good enough.

I have zero idea what the manual is talking about, but as you saw in my videos, it's not exactly clear most of the time. Haha...
 
I've had the bevel box out several times to lube/check splines. The female portion of the pinion spline is tapered so there is no problem catching the driveshaft spline for assembly. I've never used any string, sleeve or other support for this. FWIW.
 
My concerns were unfounded, but put at ease by you folks. It went on at 2nd try. Slipped right in after clearing the bevel, and the upper lift helped a lot.
After the first try of changing my own tire, I found out it was just not worth the hassle, boy, those side walls are solid!!!
So took it over to Rocky Mountain ATV (where I bought it last April) and had them do it. That was one of the best $50 I've spent. I warned them that I had Ride-On in it, and might be messy. They asked if I wanted Dyna beads or Ride-On in the new tire. I told them I had two bottles at home, but they said it was no extra charge to add it. So that was a no brainer. They said give them two hours, so I came home and cleaned and lubed the bevel box and shaft and put it back on. Discovered I ruined my 3/8" Torque wrench getting the wheel axle shaft nut off when torquing the bevel box nuts. By then I headed back over and picked up the rim and tire.
That will be tomorrows job. I'll attempt to polish the wheels while it is off the bike. And drain an fill the bevel box with new oil while the pipes are off.
Then should be good to go. Got a new Harbor Freight in town so off to get me a new torque wrench AND an breaker bar. (Still have one of their 1/2" torque wrench's, so saved a trip today.)
Since I bought all of the tire tools, I might just try (only one try!) and do the front wheel when that tire needs replacing.
Thanks for your input, all!!
 
Back
Top