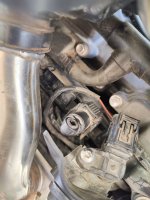
Rocket 3, 2020 and later, Tank Removal

When I do certain jobs, I never know when I'm coming back to them, and I easily can make mistakes. Especially if the job is new to me. I was scared to pull the tank off of my new Rocket, so i set out like I usually do, with my numbered baggies and went at it. I made a list of my steps, and my small parts coming off got put in numbered baggies. Attached is a list of my steps, copied from my Word document.

2020 and Later Rocket 3 Tank Removal
Past few years I've gotten into the habit of taking lots of pictures with my cell phone. during bike and car projects. It slows things down but it helps to later figure out where all the nuts and bolts came from. I like the baggie idea, I should do that. I might not kick so many parts into the black hole of oblivion as I move around with my big clumsy feet.
 
I did this yesterday and barely lifted the front of the tank and my fuel feed snapped off inside the fuel feed tubing. The plastic plug nub thing that the tubing fits over, snapped off inside the tubing, like it was dry rotted. Trying to find another online to replace it without having to buy the entire assembly from bike-parts-triumph. Anyone know what I'm talking about?
 

Attachments

  • Screenshot_2.jpg
    Screenshot_2.jpg
    4.7 KB · Views: 45
  • IMG20230509125317.jpg
    IMG20230509125317.jpg
    153.5 KB · Views: 46
When I do certain jobs, I never know when I'm coming back to them, and I easily can make mistakes. Especially if the job is new to me. I was scared to pull the tank off of my new Rocket, so i set out like I usually do, with my numbered baggies and went at it. I made a list of my steps, and my small parts coming off got put in numbered baggies. Attached is a list of my steps, copied from my Word document.

2020 and Later Rocket 3 Tank Removal


siphon gas out of tank (siphon is in bottom drawer of tool cabinet)


Fuel pump fuse, 7.5 amps, pulled out. Bag five. Pushed starter button until bike stalled to get fuel pressure out of fuel rail.

battery removal b.1

Clear small windscreen removed b.2

R black plastic mount for screen, thin tapered end goes down- b3

L Black plastic mount for screen removed, and flyscreen take off. bag Number four

Stock harness cover, just in front of handle bar clamp removed. It is located between handle bar and front screen. The screws are accessed through access holes visible at upper portion of wires and stuff after flyscreen is removed. The screws are #3 hex head.

GPS taken off (not applicable)

Removal of ram mount at handlebar, Bag seven (not applicable)

Loosened instrument clamp, then tilted the instrument cluster upward and towards the front of the bike, away from the tank, allowing room to lift the tank when the time came. (Torque is 6.6 lb-ft)

Removal of Allen bolt at front of tank, Bag eight

Little black cap over the screw at the rear of the tank (nipple cap), removed. bag nine

Bolt and round cross piece that goes to the strap at the rear of the tank removed, Bag 10

Long linear aluminum strap removed, placed on workbench

Long pin bolt, goes through rear tank pivot, 8 mm, the head of the bolt is on the left. Also pulled out the metal sleeve, pulling it out from the left side, the sleeve is what the bolt sits in. Bag 11

Undid rubber hose on right side of under tank, by raising the front of the tank upward. This hose connects to the charcoal canister

Had to remove screw from the stupid on off switch located at front aspect of L side cover, so I could get to the fuel rail connector plug on the left side of tank . bag 12

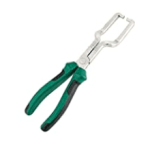
Pushed the lock clip back on the quick connect fuel line, left side of tank, and used fuel line disconnect pliars to squeeze each side of the connector, allowing it to come off.

Electrical plug undone under tank: the tank portion of the line gets removed by going forward with the male piece; there is a single tang on top of the plug that gets lifted up, allowing me to pull the male portion towards front of bike.

Tank Lifted off
i cant seem to get how to get to the hoses and electrical connectors to remove the tank any pics?
everything else is free i am painting the bike
 
Yes, I've done it. Great write up above, btw. I was installing aux lights and wanted to route the harness carefully by removing the tank. The part of the description above that should be in bold face is to use disconnect pliers, which I did not have. No room with the ignition switch to get a purchase on that connection without 'em. I tried and tried. I will order some special pliers for when I need to change plugs, valve adjustment, etc., but in the meantime I just went to plan "B" and fished it through with a heavy duty zip tie.
Man am I glad I ran across your post. I'm getting my brand new 2024 Rocket 3R this spring an will be installing my new Zumo XT2 on it. I never had much problems removing tanks from bikes but something tells me that this one is going to be a little different, so I started thinking that maybe I'll try what you did. How did you keep the cable from getting in contact with a hot engine or does it even get that warm on the top? you have any tips?
 
Here's a photo showing what's under the tank. This is the first time I removed the tank and you'll see where my wires were routed. I also supported them near the front of the tank with a zip tie to something near the steering column to keep them from sliding down there. You'll want to run your wires on the left side (intake- cooler and less obstructed) over that rubber bumper the tank sits on. It'll be the only thing between it and the tank that will keep the wires in place.

1703156221356.png


Now, having removed the tank I have them secured more neatly, but other than that it probably doesn't really matter.

If you plan to do any work on your bike I'd recommend ordering those fuel line pliers so you can at the very least change spark plugs, air and fuel filters.
1703156795118.png


Here's more on that for the 10K and 20K services.....


Attachments

  • 1703156749002.png
    1703156749002.png
    5.9 KB · Views: 11
Here's a photo showing what's under the tank. This is the first time I removed the tank and you'll see where my wires were routed. I also supported them near the front of the tank with a zip tie to something near the steering column to keep them from sliding down there. You'll want to run your wires on the left side (intake- cooler and less obstructed) over that rubber bumper the tank sits on. It'll be the only thing between it and the tank that will keep the wires in place.

1703156221356.png


Now, having removed the tank I have them secured more neatly, but other than that it probably doesn't really matter.

If you plan to do any work on your bike I'd recommend ordering those fuel line pliers so you can at the very least change spark plugs, air and fuel filters.
1703156795118.png


Here's more on that for the 10K and 20K services.....


Awesome, thanks for all that. I'm getting a 1/4 cable sock to give it a little extra protection and probably won't take the tank off until I really have to. ****, I'm sounding like I have the bike already but 3 months will go by very fast. 😁
 
Back
Top