KalSaint
.020 Over
Good Morning Everyone,
I recently installed Paul's Viking Header exhaust, and when I installed it, I saw that the factory gaskets were still inside the ports, so I went ahead an put on the new header. When I did this, I made sure to make sure it hadn't rolled downward, and I thought I had it pretty well "flat" against the gaskets. I tightened the acorn nuts to 19 nm (14.01 ft/lbs for us imperialists) and bolted on the silencer. I loaded in the 20355 KN TORS.hex "Rocket III Roadster Aftermarket exhaust, Roadster tuned for 3xKN and TORS 100%secs opened on all rpm, all gear ignition tables copied from highest gears to all other gears speedo corrected 250 kph top speed made by Bruce Ingram in Houston Texas. " as the first trial run tune (while I search for a good tuner around east central Florida.) On my recent round trip to Daytona (160is miles round trip) I noticed that the headers were really hot.
This morning I was doing some more reading here on the forums and found a couple of things that in my inexperience overlooked.
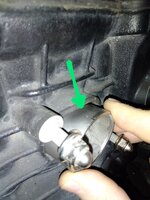
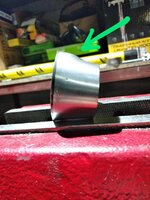
1) Acorn nuts might be too shallow with Paul's exhaust
2) Check for god**** exhaust leaks.
So I checked for exhaust leaks and it appears that I'm leaking from the port closest to the rider and the one closest to the front of the bike. Middle one seems to have sealed actually. (I have now learned my lesson to always check after messing around with the exhaust system.)
Reading the manual that IDK posted, it looks like it's recommended to change the gaskets. I've put in an order to Bikebandit.com for three new gaskets; however, I don't know if they'll actually have them in stock as they seem to be hit or miss on Triumph parts. If I cannot change the gaskets, would it be acceptable to use something like Permatex Ultra Copper RTV Silicone Gasket maker to shore up the seal?
I also plan on using Sonny's idea of some stainless washers to help with the Acorn nuts.
Thank you in advanced,
Keith
I recently installed Paul's Viking Header exhaust, and when I installed it, I saw that the factory gaskets were still inside the ports, so I went ahead an put on the new header. When I did this, I made sure to make sure it hadn't rolled downward, and I thought I had it pretty well "flat" against the gaskets. I tightened the acorn nuts to 19 nm (14.01 ft/lbs for us imperialists) and bolted on the silencer. I loaded in the 20355 KN TORS.hex "Rocket III Roadster Aftermarket exhaust, Roadster tuned for 3xKN and TORS 100%secs opened on all rpm, all gear ignition tables copied from highest gears to all other gears speedo corrected 250 kph top speed made by Bruce Ingram in Houston Texas. " as the first trial run tune (while I search for a good tuner around east central Florida.) On my recent round trip to Daytona (160is miles round trip) I noticed that the headers were really hot.
This morning I was doing some more reading here on the forums and found a couple of things that in my inexperience overlooked.
1) Acorn nuts might be too shallow with Paul's exhaust
2) Check for god**** exhaust leaks.
So I checked for exhaust leaks and it appears that I'm leaking from the port closest to the rider and the one closest to the front of the bike. Middle one seems to have sealed actually. (I have now learned my lesson to always check after messing around with the exhaust system.)
Reading the manual that IDK posted, it looks like it's recommended to change the gaskets. I've put in an order to Bikebandit.com for three new gaskets; however, I don't know if they'll actually have them in stock as they seem to be hit or miss on Triumph parts. If I cannot change the gaskets, would it be acceptable to use something like Permatex Ultra Copper RTV Silicone Gasket maker to shore up the seal?
I also plan on using Sonny's idea of some stainless washers to help with the Acorn nuts.
Thank you in advanced,
Keith