barbagris
Mad Scientist
- Joined
- Aug 1, 2010
- Messages
- 12,988
- Location
- On the verge of insanity
- Ride
- 1979 Guzzi V1000G5 - 2018 KTM 790 Duke
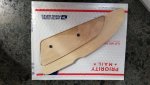
Actually all you need are fairly cheap wood / soft material bits. These have a very sharp point in the centre witch will not slide about. A lot of metalworking bits cut TOO hard and will cause cracking. And VERY little pressure - highish speed.I have a full size drill press and many different grades of hardened bits. Not an problem
Scrape material out - not CUT it out. if you smell burning you're going to fast.