
Journeyman
"And this one is just right" ~ Goldilocks
Update: manufacturing glitch. I talked with someone at Progressive and after seeing my photos, they seemed pretty sure that's what happened. ***Read on if you are replacing springs or servicing forks.
I hope others will have better luck. I couldn't wait for a replacement, so I put the original springs back in, BellRay 7wt, and new seals- a definite improvement. Too bad. I'll never know how much better the Progressives might have been.
***If you're contemplating doing the fork job yourself, with the right tools it is not that bad. I bought a spring compressor, a tool to set the seal, 2 feet of 3/4 steel square tube with a wall thickness of 1/16th (.0625) to hold the damper cartridge from spinning, and made a syringe thing to create the proper air gap. Follow the manual and it's pretty straight forward. You can do it.
Beware when reinstalling the spring cap. The orientation of the spring cap in the manual is not shown consistently. On pages 14.10 and 14.15 it shows the spring cap turned so that the smaller part goes into the spring. That way the spacer fits in a shallow cup formed by the larger side of the spring cap. This is correct. But on page 14.13 it shows the spring cap flipped so that the wider cup part fits over the spring and the smaller part goes inside the spacer= wrong. See photo of pages from manual- picture at left is wrong, other two photos show the correct orientation for the spring cap.
----
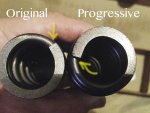
On an '11 Roadster I'm trying to install Progressive fork springs (11-1529). Trouble is the "spring cap" won't fit in the spring. The ID of the Progressive spring, on the tight wound side that goes pointing up, is too small for the cap to go inside. You can see in the photo that the end of the spring turns in resulting in an oblong hole that is too small.
Flipping the spring over (progressive says no) works for the spring cap, but you can't pull the damper rod up past the spring through the smaller opening high enough to catch the nut with the tool. It's obviously catching on the smaller spring opening.
Please let me know if this sounds familiar and if you found a solution, but I guess the answer is obviously that they sent me the wrong springs (in the right box). Update: Manufacturing error.
Too much hassle to get replacements and have to get to work tomorrow, so back to the original springs and 7W oil.
------


I hope others will have better luck. I couldn't wait for a replacement, so I put the original springs back in, BellRay 7wt, and new seals- a definite improvement. Too bad. I'll never know how much better the Progressives might have been.
***If you're contemplating doing the fork job yourself, with the right tools it is not that bad. I bought a spring compressor, a tool to set the seal, 2 feet of 3/4 steel square tube with a wall thickness of 1/16th (.0625) to hold the damper cartridge from spinning, and made a syringe thing to create the proper air gap. Follow the manual and it's pretty straight forward. You can do it.
Beware when reinstalling the spring cap. The orientation of the spring cap in the manual is not shown consistently. On pages 14.10 and 14.15 it shows the spring cap turned so that the smaller part goes into the spring. That way the spacer fits in a shallow cup formed by the larger side of the spring cap. This is correct. But on page 14.13 it shows the spring cap flipped so that the wider cup part fits over the spring and the smaller part goes inside the spacer= wrong. See photo of pages from manual- picture at left is wrong, other two photos show the correct orientation for the spring cap.
----
On an '11 Roadster I'm trying to install Progressive fork springs (11-1529). Trouble is the "spring cap" won't fit in the spring. The ID of the Progressive spring, on the tight wound side that goes pointing up, is too small for the cap to go inside. You can see in the photo that the end of the spring turns in resulting in an oblong hole that is too small.
Flipping the spring over (progressive says no) works for the spring cap, but you can't pull the damper rod up past the spring through the smaller opening high enough to catch the nut with the tool. It's obviously catching on the smaller spring opening.
Please let me know if this sounds familiar and if you found a solution, but I guess the answer is obviously that they sent me the wrong springs (in the right box). Update: Manufacturing error.
Too much hassle to get replacements and have to get to work tomorrow, so back to the original springs and 7W oil.
------
Attachments
Last edited:
")
