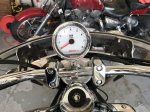
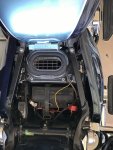
Just Installed A Tachometer On My R3T

Did you actually read the posts ? All the details for what we did are in there. Then if you still have questions, please ask.

I have read ALL the posts numerous times. Did not find anyone that connected to the ignition. The wires are not long enough to reach anywhere else.
I even quoted the posts. :) But still want the best way to do my own.
 
Far less complicated to connect the power wires to the wiring for the position lamp under the headlight. As Stevie Nicks sang, "You can go your own way, but don't go away . . ."

Have fun. Let us know how it turns out.
 
I have read ALL the posts numerous times. Did not find anyone that connected to the ignition. The wires are not long enough to reach anywhere else.
I even quoted the posts. :) But still want the best way to do my own.

All the wires are short on the tach. I put a 4 wire male molex connector from radio shack on those 4 wires. This molex now contains the positive wire, ground wire, switched taillight wire and the coil trigger wire on the molex. I ran a wire bundle from the rear of the bike to a 9 pin female molex connector I made up. I placed it forward under the tank. That bundle included a battery ground wire, a fused battery positve wire and a wire that I tapped off from my taillight wire found under the right side cover. I used that nine terminal molex, (from radio shack again) and tied (jumpered) three set of terminals together to give me 3 connection point sources for each of the 3 wiring sources. This would allow me to add other things to the molex without running wires forward again for other items I may want run. I currently use power points from the nine pin molex for the tach connections and my GPS connections when I want to use it. I then ran one set of the positive, negative and the taillight wire from the male nine pin molex to a female 4 pin molex and in addition I ran the coil trigger wire to the other available pin on the 4 pin molex. I crimp and solder every wire connection I make up on my bike. I also use heat shrink tube between the end of the connector terminals and the wires. Dialectic grease on all connections. I plugged all the connections together and you are good go.

Now that's how I wanted to do it. I can unplug the tach if I want to remove it or add additional terminal pins to the male 9 pin molex for another item using battery pos, negative or the switched wire. Not sure what you want to do. I used the taillight wire because I can get to it in an easy manner.
 
Tail light wire ? @Bedifferent How to get to that ? I've been pining for that for months, wanting to hook up the Add-more lights for the GIVI 55 trunk.

And I hope you're going to say something like, "And the brake light is right next to it."
 
Tail light wire ? @Bedifferent How to get to that ? I've been pining for that for months, wanting to hook up the Add-more lights for the GIVI 55 trunk.

And I hope you're going to say something like, "And the brake light is right next to it."

Remove the seat...behind the right side cover you will find a two wire connector. One yellow wire and one black I believe. Tough to get to and buried somewhat above and behind the ECU. It's on a short leash, but you can pull it apart. I actually cut into the insulation on the yellow wire, a little ways away from the connector. I twisted another wire onto the exposed wire and soldered the new wire on. I then taped it up really good and put the connector back together. This was not my first choice, but I couldn't get the pins to release out of the connector so I could do it properly and shrink wrap things. ;):banghead::)
 
Far less complicated to connect the power wires to the wiring for the position lamp under the headlight. As Stevie Nicks sang, "You can go your own way, but don't go away . . ."

Have fun. Let us know how it turns out.

I hate anything in an around the headlight shell @Joesmoe. I put the eastern beaver setup in and had all I could do to put the light back on. I like things I can easily get at. What a jam packed mess that is. Besides, I did all the hard work fitting and making the tach work, and you simplifying how to program the thing. A cool little addition to our rocket. Team Rocket!
 
All the wires are short on the tach. I put a 4 wire male molex connector from radio shack on those 4 wires. This molex now contains the positive wire, ground wire, switched taillight wire and the coil trigger wire on the molex. I ran a wire bundle from the rear of the bike to a 9 pin female molex connector I made up. I placed it forward under the tank. That bundle included a battery ground wire, a fused battery positve wire and a wire that I tapped off from my taillight wire found under the right side cover. I used that nine terminal molex, (from radio shack again) and tied (jumpered) three set of terminals together to give me 3 connection point sources for each of the 3 wiring sources. This would allow me to add other things to the molex without running wires forward again for other items I may want run. I currently use power points from the nine pin molex for the tach connections and my GPS connections when I want to use it. I then ran one set of the positive, negative and the taillight wire from the male nine pin molex to a female 4 pin molex and in addition I ran the coil trigger wire to the other available pin on the 4 pin molex. I crimp and solder every wire connection I make up on my bike. I also use heat shrink tube between the end of the connector terminals and the wires. Dialectic grease on all connections. I plugged all the connections together and you are good go.

Now that's how I wanted to do it. I can unplug the tach if I want to remove it or add additional terminal pins to the male 9 pin molex for another item using battery pos, negative or the switched wire. Not sure what you want to do. I used the taillight wire because I can get to it in an easy manner.

Sure do like the idea of a plug. And I have a bunch of those 4-pin molex connectors in my computer spare parts junk box. Sounds like a plan.
Thanks all for the feedback!!
 
Sure do like the idea of a plug. And I have a bunch of those 4-pin molex connectors in my computer spare parts junk box. Sounds like a plan.
Thanks all for the feedback!!

You're Welcome. Hope it helps...the connectors and terminals make it easy to make changes and take things apart. It took a little work to make up the power harness but it was worth it. Jumpering the 3 sets of terminals in the 9 pin molex took the most time. That way I had 3 positive connections, 3 negative connections and 3 switched connections available to be tapped off if needed. Unfortunately I didn't use one of those extra taps when I recently did my GIPro. Because of the way the GIPro has to be wire into the gear position switch wiring it didn't make sense to go all the way back forward under the tank to make the connections.

Solder every connection or you may be sorry later.
 
Well, guys, a big thank you to all posting in this topic!! I installed my Tachometer today and it works like a charm. I used a 72 inch 4-pin Molex connector I ordered from amazon. I cut about a foot of the male end and soldered the three power wires from the tachometer to that. I left the signal wire alone since it has its own connector. On the longer female end I hooked the red and black wires to the respective battery posts and ran the yellow to the rear tail light wire (also yellow) right close to the battery at the top of the right-side cover. Thank you Bedifferent for that trick!! I used a voltage meter to test the connections before putting everything together. I could not get a reading off of the yellow (switched wire). Finally figured out by default that the 5-amp fuse to the position lights had blown. (Used the spare 10 amp to test it, it worked, went a got a few new 5-amps when I was finished). I don't know how long I've been riding without a tail light. o_O
clip_image001.png


I ran the wire group up under the tank and zip tied it to the main wire harness. I used the (B) signal wire from the tachometer box to tap into the middle coil. With the tank up it was way easier to connect to the coil than I had expected. I zip tied the signal wire close to the female end of the Molex connector and ran them up behind the left side steering cover. (Had to remove the one screw to tuck it under, not a big deal).

I ordered some Rivco Handle Bar Risers, so I waited to install the tachometer till I had those on. I bought a Kuryakyn P-Clamp with the risers and used that to mount the tachometer. I ran the wire group from the tachometer down the slot next to the wire set where the clutch cable used to be and connected the Molex plugs together right behind the steering cover. Got the tank back down, reinstalled the seat and sissy bar and got my key ready to test, and set up the tachometer.

Turned the key on and the initial sweep did its thing and the numbers disappeared! The back light was full on. Went into the setting mode (Thanks Joesmo and Bedifferent!) and after a couple of runs through the settings it worked!! Hurray!! I set the back light to 20% (two clicks) and the numbers are very visible in the daytime, too.

Just as mentioned in here, without the engine running the first setting moved the needle to higher "RPMs" with each click then back to where it started. In the second setting (signal hi/low) I could not tell WHAT it was set on. You have to have the engine running AND kick out into "operating mode" to see if that setting is correct. And that is why it took me a couple of times through the settings to trial and error that one. The last setting was the back light percentage, which I already mentioned I set to 20%. After 10 seconds or so, the settings automatically go to operating mode, so while I was standing there wondering where I missed, it switched back. That's where I found that I had everything right. :)

Good to go!

From Idaho Red Rocket 3's suggestion I downloaded TuneECU and bought a Lonelec cable. Idaho sent me the "hot rod" tunes. When I get used to the machine, I'll try re-mapping the ECU. That may be a few month in the future, but I have what I need!

Okay, did a lot of first's today, removed the sissybar, seat and got under the tank (ran it almost empty during a nice early cool ride yesterday, that helped, thanks for that tip!). An Oil and Coolant change are up next, got a new air filter on the way, and I'll replace the gear oil, too. Should be good for awhile after that.

Took about six hours but this was a first for a lot of things, so I took my time.

When I first turn the key on, during the sweep, I get chatter from the near the ignition coil, I don't know WHAT that is, anybody else getting that? Only after being off for a while, it does it when I turn the key on. If I turn the key back on within a minute or so after turning it off, it does not do that.

I very glad I found this forum, Thanks again, everyone here!!

Here's some pics...
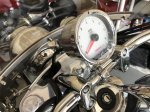
IMG_0708.JPG IMG_0709.JPG IMG_0705.JPG
 
@Starmanut ...The only noise I hear when I turn my key on is the fuel pump making its usual noise as it powers up during the sweep. Sure its not that?...It also make the fuel pump noise after you turn the key off...It takes about 10-15 seconds before you hear it after the key is turned off.

BTW... I'm glad you got everything hooked up and working. Glad we could help!
 
Back
Top