Cam chain, guides and 22mm drop in tensioner

That's kinda what I was planning to do it over winter. I'll only order that sprocket if it's got wear or not as well .

Only thing that confused me is when the manual says turn the engine 15 degrees after tdc to place the cams initially. Is this so that the pistons sink a little and the valves dont touch. The pistons while your turning them and maneuvering there position to have the Mark's on the sprockets line up

Yes avian from what I’ve read it’s to ensure the pistons are clear of the valves as you secure the ladder in place.
 
Ignore the "Located Camshafts" Image in the manual section 3.12, it's as wrong as wrong gets.

Step 1: Order 16 of these and put away the stupid T30 tool, grab your 10mm instead.
BF6X40FCLZ - Flange Bolt 10.9 Zinc [BF6X40FCLZ] - $0.44 : Bel-Metric, Metric Hardware, Metric Fasteners, Metric Bolts, Metric Nuts & Time-Sert Thread Repair

- Check all valve clearances, source shims required as needed.
- Turn to TDC, remove tensioner, release all ladder bolts in correct order. Remove chain, ladder and cams and replace shims required.
- While at TDC set the Intake cam in so the #1 lobes are pointing towards the throttle bodies. Set the Exhaust cam so the #1 lobes are pointing towards the exhaust, this is the most relaxed position and does NOT risk valve to piston contact unless you turn the motor over before aligning the cams. As below but your ladder won't yet be in place:
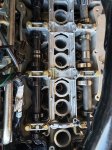
Cam Position.jpg
- Lube all lobes and journals.
- Set the cam chain in place on all gears.
- Set the cam ladder on, lube all bolts with oil and finger tighten all bolts.
- Tighten all ladder bolts in 3 or 4 even steps, ending with a final torque @ 10nm.
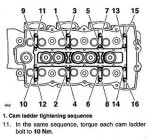
Torque Order.jpg
- Check alignment of the cam gear marks as seen in the manual. You can use 2 x 20mm wrenches instead of the tool they specify. Just lift the chain off 1 cam, use the 20mm to turn it to the right position and lower the chain. Using your assistant have them do the same on the other cam, or, if you can manage holding the first in place while adjusting the second so the marks are lined up, you're golden. Leave all slack on the tensioner side of the chain the best you can.
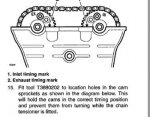
Timing Marks.jpg
- Install the tensioner.
- Turn engine 4+ times clockwise. Stop at TDC with the cams situated as earlier, intake #1 pointing to throttle boddies, exhaust #1 pointing at headers.
- Check alignment marks again.
- Double check all valve clearances if shims were replaced.
- Refit cam cover using RTV/anerobic sealant on the semi-circular sections, torque to 10nm.

On first start hold at 1,500 RPM for 2 minutes, then let idle until fan turns on.

Dun :p

If you go through it and the exhaust cam keeps ending up 1 tooth off, so it's pointing too low instead of at the intake cam mark when you align them, leave it 1 tooth pointing too high before installing the tensioner and the tension will pull it in place.
 
Last edited:
God you guys are hilarious.

I actually am not sure how much adjustment range you have once the spacer is installed. The manual should have something about it. I don't use the hydro any longer so am ignorant of it's parameters.

For OP when you order the chain, it comes with the cam sprokets, but not the crank one. There's no need to replace that one unless it's visibly worn.

We're it my bike, I'd put the spacer in, order the parts,and replace it all over the winter. Stock cam timing is extremely simple as far as timing a DOHC engine goes, just follow the manual, and use the fixture if you can, or 2x20mm wrenches and a good assistant.

If you get stuck, don't force anything or "close enough" it. Take a pic and ask for assistance here.
Took you long enough:roll::roll::roll::roll::roll::roll::roll: several Long post's on here showing the procedure in detail. Not hard.
 
Thanks claviger for taking the time to write that. The manual makes things sort of difficult to understand with the photos and wording. Last question or thought I got is if I should take this auto tensioner and throw it through someone's window and replace it with a manual one , or keep it and I guess you can reset it.
 
Most are too long and it's really a simple process. Was mainly just pointing out to ignore the 15 degree crap, it's not necessary. There's tons of piston to valve clearance at TDC.

No need to swap tensioner to manual if it's a stock engine.
 
I was wondering if anyone knows what the chain adjuster clearance on an engine with just a few 1000 miles?
 
It'll vary from bike to bike.

Adjuster measurement is a very rudimentary tool to get an idea of the amount of stretch your chain has. Given they start different length and different riders will cause differing amounts of initial stretch based on riding habits, it's impossible to say with any accuracy.

Doubly so considering there are 2 different chain designs and at least 3 different tensioner blade designs.
 
i was just trying to get an idea of how much mine has stretched . it is now 24mm now if it started at 4 that's a lot of stretch but if it started at 20 then not to bad.
i guess just wishful thinking:roll::roll:
 
Ok Rob pretty much has it jandled I will just interject. The spacer does not increase adjustability of the auto tensioner. It merely increases the spring compression back to where it was before wear occured. In otherwords bring the plunger push strength back up so it will adjust. I can't remember but its not much more then 25 mm. So this winter would be the time to get her done.
 
I just measured mine as I have it out right now, it’s 26mm fully extended and it’s running at 20mm when it’s in service. I can see the spot where it normally is extended to.
 
Back
Top