Jetstream indicators and i.nex from Kellermann

Guru Shudamundi

.020 Over
Joined
Apr 11, 2024
Messages
16
Ride
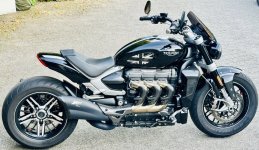
Triumph Rocket 3 R Storm
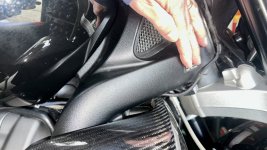
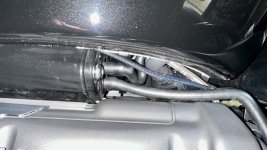
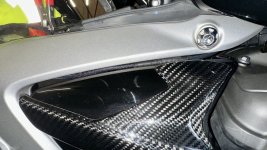
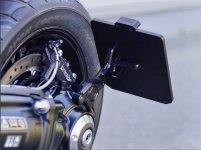
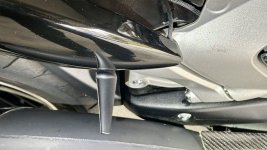
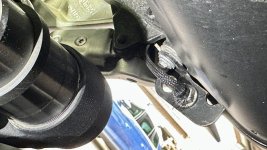
Hi, planning on installing front and rear indicators through the i.nex hub on the Rocket 3 Storm.
I haven't looked yet, but are the front and rear indicator wires easily located/situated under the seat?Any help into the right direction would be great.
1769672960168.png
1769673013639.png
 
You don't need the hub, the wiring is straightforward on the rocket.
 
I installed JetStreams on my Rocket 3 GT, MY 2023 in late 2024. After straight installation without i.NEX I got error messages from the system and the indicators wouldn't work. Purchased the i.NEX and after installation it worked. Flawless until now for the last 14 months.
Placed the i.NEX under the seat, as it asks for direct battery connection. Needed to pull cables from the front indicators to the seat and back again. Annoying, but doable. The module itself was placed in a plastic bag (splash-proof) under the seat and that was it. The work itself took two long afternoons on a rainy weekend. Removal of the fuel tank was not necessary; used plastic straps for "invisible" wiring beneath.
Judging by A1A Riders remark, it seems that the latest Storm Edition works without i.NEX. Good for you ;)
Thanks a lot! So, in case the i.nex is needed after all, do you remember what settings you had on the i.nex?
Also, I had a lot of problems with the Jetstream on another motorcycle, similar in setup to the Rocket, where it seemed the vibrations were too much for the Jetstreams and I had to replace them twice. Good to read that you had no problems with that.
For the rear, did you go with the regular Jetstreams, or the DF's with brakelight?
Thanks.
No brakelights; just simple indicator function.
Just checked in my garage: settings of my i.NEX (V12 type, by the way...): all 4 rotary switch resistors are set to "2". That way I get the desired flashing frequency, which the police here in Germany likes to see :cool:
Vibrations were of no issue on the Rocket (so far... 🤞🤞🤞)
 
Last edited:
1769864855701.png

Happy because I got it to work. Now a matter of attaching the rear lights and then cable management. How were you able to lead the cables without removing the tank? And where can I exit the battery bay to lead the cables to the front? Left side or right side? I can't seem to figure out where to go from front into the frame.
I went out on the right side of the battery. I inserted all cables (back and forth) in a single PET braided insulating hose, so only 1 „cable“ needed to be hidden. It‘s only visible, when you bend down the head below the tank level and - since I did not get it through the frame at the front - when it appears beneath the tank and goes up to the front cover. Some people may not like this look, but I actually don‘t mind too much…
Beneath the tank you may find enough options to fix the cable with small plastic straps, so the cable will remain hidden when looking from above.

Attached some pics; hope that helps to visualize…
 

Attachments

  • IMG_8372.jpeg
    IMG_8372.jpeg
    156.7 KB · Views: 44
  • IMG_8371.jpeg
    IMG_8371.jpeg
    154.4 KB · Views: 42
  • IMG_8370.jpeg
    IMG_8370.jpeg
    162.8 KB · Views: 51
  • IMG_6142.jpeg
    IMG_6142.jpeg
    249 KB · Views: 46
Last edited:
Question for black bandit. I saw you rerouted the rear blinkers to the side. My question: how and where does the cable run from the rear blinkers? I am planning to tap and reroute from their starting point to the I.nex, instead of running wires all the way to the back, like it has been done with the front blinkers. Thank you for answering in advance.
 
Question for black bandit. I saw you rerouted the rear blinkers to the side. My question: how and where does the cable run from the rear blinkers? I am planning to tap and reroute from their starting point to the I.nex, instead of running wires all the way to the back, like it has been done with the front blinkers. Thank you for answering in advance.
In my case this was quite easy, as I placed the indicators right beneath the seat. Cables have a length less than 25 cm :)
I drive with a single seat and use no bags, so visibility to the back is always guaranteed. Also replaced the original plate holder with a side-held version w/o indicators (Company „Wunderkind“ in Germany). Cables run from indicators to the iNEX below the seat and right back (around the frame). When the seat is attached, no cables are visible. Some more pics attached. Hope that helps.
 

Attachments

  • IMG_0172.jpeg
    IMG_0172.jpeg
    120 KB · Views: 33
  • IMG_8382.jpeg
    IMG_8382.jpeg
    143.8 KB · Views: 30
  • IMG_8381.jpeg
    IMG_8381.jpeg
    166.1 KB · Views: 29
Last edited:
Back
Top