I did it as described in Post#2 above removed pop rivets, turned bracket around and flattened the circled bit above a little in a steel vise and used the two large strap holding bolts to fix the pad back on. Bent bracket back, fitted with longer bolts, spacer washers and was very proud of myself it looked wonderful - until I tried to fit the solo rider's gel seat. The original pillion pad is quite long and didn't leave enough room after engaging the front to get the solo rider's seat down at the back to engage spigot. Doh!
So I turned it back the normal way and using a bench vise with wooden blocks to get the bend in the right place, two large shifters and my whole 160 kg I pushed it back towards the workshop wall so I did not keep tipping the whole workbench forwards. I bent the bracket pillion pad mounting area forward and up about where the front of the pillion pad ends (top of my brown circle in photo above). I had another 'generic' back rest pad with fitted mounting thread inserts and drilled holes in the bracket to match. I fitted without a pillion seat and as the shorter generic back pad pad is now a few inches further back it allows the solo rider's seat to engage at the front and angles down at the back to engage the underseat spigot. I then tried mounting it piggy bag on top of the gel pillion pad and bracket as well and that worked fine too. I thought about but have not yet cut off the excess pillion seat bracket flanges and holes yet as I may come up with a use for them mounting electricals or other bits and pieces.
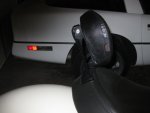
I had some extra left over 'L' shaped stainless steel brackets I had used for my first attempt with just the generic back pad that had too much flex so I incorporated them as well but not essential.
For this to work you have to be on the large/tall size to have the backrest engage your back but I'm sure you could mount the pad with a block or similar between it and the bracket to bring it forward and simply unscrew the pad to fit or remove the rider's seat. With my other Classic Touring dual seat with factory backrest fitted in the square hole that fit Roadsters I find I have to use the rear most angle adjustment setting to fit comfortably and even then it can be a tad tight for me.
So an option is to get a 2nd hand R3 pillion seat for about $50 and if you check out the
eBay generic back pads here for about $30 delivered make one in an afternoon.
AUD$30 delivered looks quite good
Link Removed
AUD$10 bucks delivered to try concept is pretty cheap and no cutting your expensive one.
Link Removed
$20 delivered studded 3 threaded holes with measurements-
Link Removed
The 'sofa' look
Link Removed
tall 'sofa'
Link Removed
'Triangulate' version
Link Removed
Heaps more from this site
backrest pad | eBay
I will try out my home made version for a while and may even sell my Classic Touring dual seat version if I am completely happy with it as I am planning to fit some red stripe front and rear guards I picked up and never carry pillions anyway.
I can take some photos tomorrow if required.
Well here we go with photos:
Note additional 'L' shaped shiny stainless steel brackets at front. I ended up hammering them to match the curves of the original pillion seat bracket.
The four shiny screw/bolts at top outer edges are not engaged with anything at the moment and I will probably use them to mount electrical connections for heated clothing etc.
Once it is fitted with seat mounted you can still bend the back rest forward to desired engagement with lower back.

")