
Journeyman
"And this one is just right" ~ Goldilocks
Part 1
This includes valve clearance check and shim replacement. Also air, fuel, spark plug and coolant replacement, and bleeding the clutch.
This is a work in progress, so edits and further information to come...
 www.r3owners.net
Take photos as you go to document wire and hose routings, etc.
www.r3owners.net


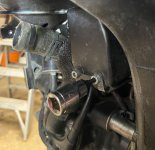
The manual says to remove the left side cover- not necessary. Remove the right one (pops off) to help with removing the bolt above.
Be sure to remove the bracket in the back attached to this bolt.
There is another PIA bracket attached to the cover in the front and the brake line. I was able to lift it high enough to work out the cover after sliding it up the brake line and spinning it out and away as much as I could. I removed everything on it after I removed the radiator, as seen here.

No need to remove the radiator unless you need to replace shims.
Here's the bracket after I spun it out of the way (second photo). It's also attached to the brake line. The first photo shows a hose box that's attached to it. There's also a couple of other things. Without the radiator out you may just have to work around it as I did.


With the bolts and brackets out of the way the cover was stubborn about coming off. The gasket was sticking pretty good. I used a rubber mallet and small piece of wood to *gently* tap up on the edge of the cover. Take your time. Be gentle. It'll come.
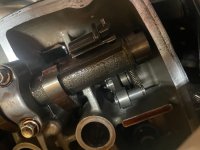
The service manual instructs you to remove the cover from the left side of the bike. Well, you're going to have to jump over the fuel connect and it's fragile. I got it out on the right side easily and think that's a typo along with the need to remove the left side cover.
Here's what you'll see. The "springie" things, btw, are decompressors. They don't have those on the 2.3 bikes.


Measure your clearances. If good- great (I'm never that lucky)! Reverse order and go ride. If off, you'll need to pull the camshafts in order to replace some shims.
Next...
This includes valve clearance check and shim replacement. Also air, fuel, spark plug and coolant replacement, and bleeding the clutch.
This is a work in progress, so edits and further information to come...
- Get the service manual here..
2020 Rocket 3 R GT Manual - Searchable by keyword
This is a SEARCHABLE version of the 2020 Rocket 3 R GT Manual. Updated 2-27-23 File size greatly reduced. Still searchable.
www.r3owners.net
Take photos as you go to document wire and hose routings, etc.
- Remove fuel tank (page 796 in manual), Plenum Cover and air filter (136), Fuel Filter (142), Spark Plugs (154)
- See processes above here with photos....
10k mile service - DIY (also, Spark Plugs Not Tight & Wire Boots Not Pushed On!)
Sharing my experience here changing the air and fuel filter and inspecting the spark plugs. Refer to the manual for the basics, but here are things that may help, along with some very surprising discoveries I made... 1) Removing the tank There are three things to disconnect besides the bolt...
www.r3owners.net
- Remove Evap Canister (923)
- Camshaft Cover (250)
The manual says to remove the left side cover- not necessary. Remove the right one (pops off) to help with removing the bolt above.
Be sure to remove the bracket in the back attached to this bolt.
There is another PIA bracket attached to the cover in the front and the brake line. I was able to lift it high enough to work out the cover after sliding it up the brake line and spinning it out and away as much as I could. I removed everything on it after I removed the radiator, as seen here.
No need to remove the radiator unless you need to replace shims.
Here's the bracket after I spun it out of the way (second photo). It's also attached to the brake line. The first photo shows a hose box that's attached to it. There's also a couple of other things. Without the radiator out you may just have to work around it as I did.
With the bolts and brackets out of the way the cover was stubborn about coming off. The gasket was sticking pretty good. I used a rubber mallet and small piece of wood to *gently* tap up on the edge of the cover. Take your time. Be gentle. It'll come.
The service manual instructs you to remove the cover from the left side of the bike. Well, you're going to have to jump over the fuel connect and it's fragile. I got it out on the right side easily and think that's a typo along with the need to remove the left side cover.
Here's what you'll see. The "springie" things, btw, are decompressors. They don't have those on the 2.3 bikes.
Measure your clearances. If good- great (I'm never that lucky)! Reverse order and go ride. If off, you'll need to pull the camshafts in order to replace some shims.
Next...
- Radiator Removal
- Clutch Cover Removal
Attachments
Last edited:

 nice, no more inspection cover and crank driving water pump. Those cam chain guides look awesome.
