atomsplitter

Living Legend
Joined
Nov 29, 2007
Messages
2,757
Location
Keller, TX
Ride
17 T-120 Black, 20 Bobber Black, 98 Trophy 1200
I've already posted about the carburetor jets being blocked so I'm not going to repeat myself here. Part of the instructions from 6 Sigma stated to use a high flow air filter so I've been toying with the idea of using individual pods, but that got me to thinking I may be introducing a vulberability so today I opted for a K & N filter that fits inside the air box. It's probably not an exact fit and has to be goo-puckied in using K & N filter grease to seal the airbox, but it also ensures the engine internals are protected and crankcase ventilation isn't abrogated. The negative pressure of the airbox keeps the crankcase from over pressurizing. On 70's bikes I've put a filter on the crankcase return hose with success, but they aren't as compact as the newer cases so I'm playing it safe. Bike Bandit has been very quick to take my money and then disappear so the bits and bobs I have ordered from them may show up in the future, or not, only time will tell. I'm not going to wait on them to get the bike up and running.

I got the seat back from the upholsterer today, looks the bomb (looks just like the stock seat, only it's more expensive). I have the chain, plugs, igniter, oil filter, oil, coolant ready for this weekend's round 2 on maintenance activities. I ordered new manifold clamps from Eurosport (even though I ordered them from Bike Bandit, odds are higher I get them from the local shop long before I see anything from the Bandits). Once I have the carbs installed I'll hook up my auxiliary tank and see if I can get the bike to fire. The coils are in the US and have been for a week in Chicago at the USPS International recieving office. I got an early delivery notice from Ebay on 7/14 (when they arrived in Chicago) saying I would have the new coils by July 19. They weren't figuring on the US Post Office holding on to them for a week or more. According to the tracking number the coils left Chicago today 7/21. So when I get the coils if the bike doesn't fire then I'll replace the coils, if that doesn't get it I'll replace the igniter. Likely before I go to that trouble, I'll verify the pickup coil gap is correct and make sure no loose connections etc. So this weekend has the POTENTIAL of seeing the Trophy start. We'll see.
 
Bikebandit is quick to take your money, then a week or 2 later I get a notification that its backordered or something. As my bikes get older and parts scarcer, I've learned to steer clear of Bikebandit.
You would have thought I learned my lesson attempting to do business with them. I didn't but I did learn after the second time.
 
Get a bundle from Oz and save shipping. None mine but Happy to assist.
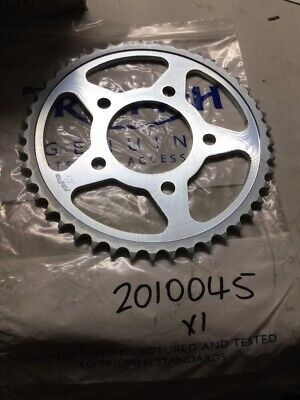
1627193046358.png


Triumph Daytona Trophy Rear Sprocket New 90-03 2010045 Dr7
Price: AU $37.90 (US $28)
1627191966912.png


Genuine Triumph, Trophy / Sprint / Trident ,1991-1998 Rear Shock/Suspension Unit.
Price: AU $250.00 (US$185 )
1627158744133.png


They have a few new old stock Trophy seats too for Au$150 (US$110 )
1627212538122.png


Here is another NOS item.
Triumph Trophy 96-03 Fuel Petrol Gauge New Nos T2500295 Dr1
AU $46.50 (US$35)
1627160177508.png


Last edited:
Well Tom and I managed to spend some quality time working on the Trophy this morning.


We got the carbs back in, changed the oil, flushed the coolant system, got the new airbox installed, and before we quit for the day, got gas in the carbs and gave it a crank. It sputtered a couple times then fired up.....to 4000 RPM. That's not a great idle speed so I'll have to work on that. We did prove the bike will start, so progress.
 
I'm fairly certain there maybe a few on this forum that believe I tend to exagerrate some of my adventures in reclamation projects like the Trophy since I've done most of my work solo. However this time I have a witness to the utter mayhem of doing simple chores and mundane tasks. Tom my son-in-law has been assisting me in doing much of the maintenance activities on the Trophy. So allow me to describe a few of the 'simple' things that occurred during our 4 hour session yesterday.

Last week I spent some time on the back porch rebuilding the Trophy carb set with the 6 Sigma kit I'd received the week before. I won't go into the details of a Mikuni BS 36 carb but suffice to say it's a snap to disassemble and clean without pulling the carbs off the rail. So we wanted to get the carbs in first and to do that we needed to install the new airbox first as there is no way to mount the carbs without the airbox in the frame (why I usually opt for pod filters). The new airbox comes completely assembled and sealed, however the boots between the box and carb inlet throats have to be transferred from the old box to the new. Tom and I sat on the back porch with the old box and new and I worked the boots off the old box and Tom installed them in the new box. There's a metal spring clip inside the boot that expands the boot against the box that has to removed first before you can collapse the boot to remove it from the old box. The clip is about a 1/2 inch wide and made of teflon. At least it seems to be because it kept slipping out of my needle nose plier grip when I tried removal. I would get a grip, twist up to pull it out and it would snap back. Not frustrating at all until about the 47th snap back. In a mildly amused state of rage I gripped it and instead of pulling pushed. That was the ticket. The clip dislocated into the air box, out of the seat. Cool beans. I had the old air box pulled apart so retrieving the band was a snap (I have plans to install a K & N in this box when I have time if I can't get enough air from the stock box). I would hand Tom the rubber boot and metal spring clip and he installed as I disassembled. After 20 minutes we had a functional airbox. One of the things I had Tom check was the inner boot lip was properly positioned. I showed him what the factory looked like (the old filter out you can see the boot fitment) I had him run his finger around the internal boot seal to feel the correct fitment and after he was done I double checked he had the boots properly positioned and it was gold. Now ready for airbox installation we took the new box and did a test fit and determined we were off a skoshe, about 180 degrees, we had in upside down. Easily remedied, finagle the box back out through a tangle of wires, tubes and cables and then finagle it back in. We were amazed there was a channel on each side of the airbox that mated up to a rubber grommets in the frame that located the airbox perfectly. Hmmnn, maybe there was some logic to this after all.

So with the airbox in we were ready to get the carbs installed. Now the removal process is fairly clear. You slacken the airbox pinch bands, then pull the airbox back as far as it will go, then loosen the intake manifold pinch bands next to the engine and pull the carbs out with the manifolds attached. Then slack the carb to manifold bands and remove the manifolds then remove the carb set enough to get to the throttle cable and choke cable to remove those. Once the cables are clear pull the carbs. We surmised the reverse order would work just as well. We are, as it turned out, collectively idiots. There is no way to do those steps in reverse order without first going insane. I know, we tried and did. So a fresh approach was the only answer that would lead to some measure of success. So what we did was first install the manifolds onto the engine intake and tightened the pinch bands as tight as we could get them. We then installed the carbs about half way through the gauntlet between the manifolds and airbox boots, trying not to distort (or destroy) the airbox pinch bands. We then worked on connecting the throttle cable. An excercise in frustration describes it like 'difficult' describes quantum mechanics. Putting the cable barrel in should take about 30 seconds, we were at it 30 minutes. I had to insert my thumb under the number 1 carb throttle plate to raise the clip high enough the slack in the cable could access it. Tom like a surgeon with needle nose pliers in each hand was working the barrel into the clip and trying to fit the cable through the slot in the clip to seat the cable and was rewarded repeatedly with the barrel popping out of the clip as the cable approached the slot. I've heard that the definition of insanity is "doing the same thing over and over expecting a different result." In this case we were striving for perfection of that thought. At some point the gods of motorcycle maintenance had had enough fun at our expense and the cable seated with the barrel properly located and the throttle was working. Next was the choke cable. In the infinite wisdom of the Mikuni enginerds they saw fit to put two cable seats on the choke rail. One is 180 degrees out from the direction the choke operates, so of course that's the way we mounted it. Realizing the choke was less than functional we tried the other seat and viola. I sometimes wonder if enginerds report to work wearing clown makeup and a fright wig. With the carbs now functional we finagled them through the last two manifolds and boots with only a few excercises in linguistic moral turpitude. Two of the pinch bands on the airbox had reconfigered into a mobius strip and needed a little attention. Tom loosened the screws as far as possible to reshape the bands and was rewarded by one of them launching itself into the ether of my garage. Sweet. While it could have landed in any number of places I was pretty convinced it would have simply evaporated just to prove a point. Tom is a little OCD about most things which comes in handy at times like that because he was latched on like a pit bull searching for that screw and darned if he didn't find it in just under an hour. Me, I've been through that excercise enough times I learned to just look for a suitable substitute in my pile of nuts, bolts, screws, and washers left over from myriad other project bikes.

Having gotten the airbox bands back in semi round condition we proceeded with installation of the airbox once the carbs were seated in the intake manifolds. I recommended to Tom we not tighten the carb side pinch bolts on the manifolds in case we needed some manuvering room. That turned into some sage advice as the airbox boots and the carb inlet throats were about one and a half inches off high/low. The carbs were low so we pushed down on the airbox and pulled up on the carbs to align the two units. That resulted in a close approximation so it was a matter of wiggling the boots over the intake rims all way round on all 4 carbs. The pinch bolts had to at the loosest possible to make this work. One wrong move and it was likely we would be launching pinch bolts all over my garage. This was delicate work. We spent 20 minutes getting everything lined up and mated, and upon inspection found the #2 boot was crimped against the carb. So we pulled it apart and finagled, cajoled, cussed, discussed, then threw a few epithets into the wind and got generally frustrated. After 30 more minutes of abject failure Tom opined maybe we should use some carb cleaner on the intake boots. I replied that would destroy the boots. He just smiled. I said to squirt some WD-40 on the inlet rims to lube them enough maybe we could slide the boots on. Sure enough after a thorough bath in the stuff the boots slipped on easily. Well aint that a kick in the head. We tightened the pinch bolts to maximum and noted our first real success at only drawing a little blood (I had somehow managed to scrape the top of my hand).
 
With the carbs in, it was time to take on the next task, an oil change. Tom got my drain pan from the shelf and then got a 13mm socket and a ratchet and attempted to unscrew the drain bolt. The drain bolt did not budge. The ratchet he was using is a standard 3/8" ratchet and he could only apply enough force to nearly twist the bike out of the front wheel vise. Well this was a pickle. I told him to look in the tool chest for a 1/2" to 3/8" adapter and get my 1/2" breaker bar out. I told him it was likely the last person to change the oil may have used a smidge more torque than the recommended 48 Newton Meters by the manual. I've seen this before where someone thinks the only way to prevent leakage is to use a come-along on 4 foot cheater bar. Tom was able to break the bolt free with the breaker bar and got the plug removed and was greeted with a steady stream of what can only be described as virgin crude. Awesome. I said the filter is also under the engine and uses a different size socket than the drain plug. He located the cover and bolt and tested about 4 sockets on the bolt. He found the 18mm socket fit and attched it the ratchet and the nut broke free without any fanfare. I warned him he was going to get some oil on his hands since the oil will drain out of that section 360 degrees around the cover plate. He was a little shocked with how much oil came out because the engine was down to just dripping from the drain plug hole. I said the new filter comes with a new O-ring that may or may not fit. If I get a filter from a Triumph dealer then the O-ring fits every time, when I order from Amazon et.al. it fits 20% of the time. This one was in the 80% catagory, so we reused the old O-ring. After getting the black putty off the cover Tom put the spring over the banjo, put on the shim washer, filter, top washer and then installed the new filter. We then put enough oil in to raise the level to 3/4 of the site glass. After a few runs I'll check that again and top up if necessary.


Next was a change out of the coolant. Tom located a bin suitable for draining the old fluid and we proceeded to drain and flush the system. The manual shows a drain plug but it occurs to me this was on some other iteration of a 3 cylinder version because look as we did, no drain plug was evident, so we decided to pull the lower coolant inlet to the water pump pipe and let the fluid drain that way (lowest part of the system). I told Tom there is ony one bolt to the water pump and the pipe is sealed with an O-ring. It won't take a lot of torque to get the bolt out because the O-ring is what does the sealing. Tom removed the bolt and nothing came out. To remove the pipe a bracket on the pipe is bolted to the engine block and to get to that you have to go between the radiator, fan, exhaust and the engine block. Nice. Tom got a socket and ratchet into the space and with about 3 or 4 hundred 1/32 turns got the bolt loose. He then pulled the pipe back at the water pump and was rewarded with a cascade of foul smelling blue-black fluid. Neato. There's less than a half gallon in the whole system so it wasn't long till the draining stopped. I fetched a gallon pitcher of water and we proceeded to run water into the system and watched when the stuff ran clear. It took awhile, about a half tub of water. Tom then reassembled the pipe into the water pump and we buttoned the system back up. He then started putting the new antifreeze in and whitin a few seconds fresh bright antifreeze was dribbling rapidly out of the connection of the pipe and water pump. Tom thought he hadn't tightened the bolt sufficiently and gave it a good twist. Nope, that didn't slow the leak, but it did strip the screw threads in the pump body. Nice. He pulled the bolt out and handed it to me, the top 5 threads had aluminum in them. Awesome. I suggested we go to Ace Hardware and get a longer bolt. The stock bolt didn't go all the way through the housing and the housing threads went all the way through so the bolt coulld actually penetrate out the back of the housing. So to Ace we go. Found the bolt was a 6 X 1.00 and after searching for about 10 minutes located a box of different length bolts, we picked one that was about twice as long as stock and got a washer to fit it. I thought since the stock unit was a flanged bolt this would cover us. We got home, got the new bolt installed and it still leaked. Rat Spit. So I said we needed to take it back apart and pull the old O-ring and see if it was damaged during Tom's pipe install. Tom pulled the pipe again and looked inside the water pump inlet and asked where the O-ring was.


"What?" I asked.


"Where is it supposed to be?" he replied.


"It should be against a ridge inside the water pump inlet," I said.


"Nope," he said looking into the housing.


Tom then started feeling around the bin full of old and new antifreeze and found the O-ring. "This might help," he said. holding it up like a prize at the State Fair. I just rolled my eyes and thought 'perfect'. After putting the O-ring over the pipe end and getting everything bolted back up we again added antifreeze and this time no drips, dribbles, or consternation. Tom asked about bleeding the system and I replied that'll be done once the engine starts and the water pump pushes the fluid back into the radiator. I installed the radiator cap and retaining bolt, however I left the retainer only finger tight as we need to check the level after engine start.


With the oil and coolant done, next was replacing the ignition coils. Easy peezy, just unscrew the allen bolts, lose one washer down between number 1 and 2 intake manifolds and bolt the new units in. While it isn't strictly necessary to lose one washer it is what happened and oddly enough both coils now match in the number of bolts and washers. After getting the coils mounted Tom was anxious to try the engine and see if it would run. So I got my Motion Pro auxiliary fuel tank out and said we'ld need a Tee to go from the single outlet hose to the dual inlets on the Trophy, so to O'Rielly's Auto we go because the box of assorted T's I purchased a few years back didn't survive the move to Texas. After roaming the store for a few minutes we located some vacuum T's that would substitute for the real thing and back home we go. I shut the fuel valve on the aux tank off and put about a pint of gas in the tank. I opened the valve and was rewarded with gas flowing down the hose, both inside and outside as the hoses leaked like they were made of window screen. Great. Raw gas running all over the bike and my lift. "I think I need some new hose," I remarked. This time it was Tom's turn to roll eyes and undoubtedly think 'perfect.' In short order the aux tank was dry and I was fairly certain 1/2 the fuel made it to the carbs. I suggest we give it a go anyway. I switched the ignition on and held the clutch in and Tom mashed the starter button. The bike turned over and began to cough a few times. In my mind I was thinking the coils and igniter were working because there was some ignition happening. After a few seconds the engine caught and the revved up to 4000 RPM and was running on its own. IT's ALIVE!! It's alive! Holy crap shut off!! I imagined my garage turning into a fire ball and blowing Tom and I into the neighbor's weeds.


I switched the ignition off and the engine shut off. Afterwhich I pulled the retaining bolt out of the radiator and unscrewed the radiator cap. Sure enough, no coolant visible. I proceeded to pour the remaining antifreeze in the container in and couldn't see any in the tank. Awesome, I need another half gallon.


Hey, 4 hours and only a few drops of blood to prove we can be as inefficient as anyone. Not bad, not bad at all.
 
Last edited:
Tom called me last night saying he was taking today off and asked if he could come over early to work on the Trophy. Sure enough he showed up at 0655 and we proceeded to first put gas in the aux tank with new hoses now attached. Same problem, only this time the leak was coming from the ball valve in the line, so I have a new ball valve coming later today. We then changed the spark plugs, all of which showed signs of too rich mix, likely due to the filthy air filter we took out and replaced. I had to teach him how to gap plugs but he was able to get it done. After the plugs we tackled replacing the chain. That required getting the rear wheel in the air so we put my scissors jack under the center stand, tied the front forks down to the lift table with a cinch strap and then scissored the rear wheel off the table. I used my chain breaker to push out one rivet and the chain parted. I used the new link master link to connect the old chain to new and had Tom pull the old chain straight out> The old chain fed the new easily and then removed the old chain entirely. I asked Tom to loosen the pinch bolts on the eccentric adjusters so I could get enough slack in the new chain to join it. That put the rear tire into the jack but I had enough slack to join the chain ends. We verified we had O-rings on the inside and I put O-rings on the outside, put the master link plate on and then finagled the retaining clip on. My chain tool has the bits and bobs to join a continuous chain but I opted for the master link style to save a few bucks. After that we attacked the coolant overflow tank issue. The tank had old antifreeze in it and we wanted to get some fresh coolant in, so to do that we had to remove the tank from the inner fender assembly. It took about 30 minutes trying to decide how to do that since the factory riveted the tank onto the sub fender. Tom decided to just remove the fender with tank attached so we did that. The coolant in the tank was a 50-50 mix of coolant and mud. Tom rinsed the tank out as much as possible and then we reassembled the unit, poured in some fresh antifreeze and buttoned it back up.

At this point we have the majority of mechanical work done so it's a mattter of getting the engine tuned and the body work restored. Still haven't heard from the body shop on the fuel tank, hope that happens this week.
 
Back
Top