leatal
Turbocharged
As I have removed and installed a custom insert on my embellisher, I thought I would share what worked for me, with minimal effort and without damaging the OEM parts. Things needed:
1. heat gun
2. thin blade (I used a long rectangular cutting blade)
3. alcohol (for the project and for some, extra to help process go more smoothly)
4. clean rags
5. adhesive removal fluid (WD-40, Goo-be-gone, carb cleaner, or anything that loosens adhesives)
Removal Steps:
1. Remove embellisher and lay face down on clean rag.
2. Heat underside of embellisher under the area where the inserts attaches (needs to get real hot, too hot to touch!).
3. Lightly pry up on the top side or bottom side of the insert using the blade (prying on the left or right sides will not lift insert), if the insert does not separate fairly easily, you need to reheat the bottom of the embellisher as you did not get it hot enough.
4. Once cooled, remove all adhesive stuck on embellisher.
Note: You can clean the 3M sticky tape from the inside of the insert by filling the inside with WD-40, allowing it to soak for 30 minutes then scraping residue off. Be carful as the print on the outside of the insert might be effected by the cleaning solvent! These steps should provide a safe removal (to reinstall to OEM later if wanted).
Insert Install:
1. Clean/rinse embellisher and hands in soapy/clean water and allow to dry.
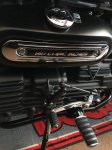
2. Make a couple of practice runs at centering insert in position on embellisher (the left/right edges will need to align with the bottom of edge the convex surface - see image 1[4]).
3. Clean embellisher, bottom of insert protective tape, and fingers with alcohol and wipe dry with clean rag.
4. Roll one side of the insert up and remove about one inch of protective tape by cutting it off.
5. Carefully place the insert in position (DO NOT allow the sticky to touch anything!)
6. Once centered perfectly in place, hold insert in position and press the exposed sticky down into embellisher.
7. Lightly lift up on the side of the insert that has protective tape and peel tape off starting from stuck down side to the opposite end. Lightly press down and guide the insert (to keep it straight) as you remove tape. Do not press the top or bottom of the insert down until the center portion of the insert is stuck.
8. Once down, firmly press the entire insert into the embellisher.
9. Wipe all down and reinstall on bike, you are through!
10. Treat the new insert with care as they are fresh out of the mold, very soft (thus flexible), and susceptible to scarring until they fully cure.
THIS WORKED FOR ME, NOT RESPONSIBLE IF IT DOES NOT WORK FOR YOU!


![image1[4].JPG](https://www.r3owners.net/data/attachments/115/115707-ea37230ff8fce210f2130030338e26d2.jpg "image1[4].JPG")
1. heat gun
2. thin blade (I used a long rectangular cutting blade)
3. alcohol (for the project and for some, extra to help process go more smoothly)
4. clean rags
5. adhesive removal fluid (WD-40, Goo-be-gone, carb cleaner, or anything that loosens adhesives)
Removal Steps:
1. Remove embellisher and lay face down on clean rag.
2. Heat underside of embellisher under the area where the inserts attaches (needs to get real hot, too hot to touch!).
3. Lightly pry up on the top side or bottom side of the insert using the blade (prying on the left or right sides will not lift insert), if the insert does not separate fairly easily, you need to reheat the bottom of the embellisher as you did not get it hot enough.
4. Once cooled, remove all adhesive stuck on embellisher.
Note: You can clean the 3M sticky tape from the inside of the insert by filling the inside with WD-40, allowing it to soak for 30 minutes then scraping residue off. Be carful as the print on the outside of the insert might be effected by the cleaning solvent! These steps should provide a safe removal (to reinstall to OEM later if wanted).
Insert Install:
1. Clean/rinse embellisher and hands in soapy/clean water and allow to dry.
2. Make a couple of practice runs at centering insert in position on embellisher (the left/right edges will need to align with the bottom of edge the convex surface - see image 1[4]).
3. Clean embellisher, bottom of insert protective tape, and fingers with alcohol and wipe dry with clean rag.
4. Roll one side of the insert up and remove about one inch of protective tape by cutting it off.
5. Carefully place the insert in position (DO NOT allow the sticky to touch anything!)
6. Once centered perfectly in place, hold insert in position and press the exposed sticky down into embellisher.
7. Lightly lift up on the side of the insert that has protective tape and peel tape off starting from stuck down side to the opposite end. Lightly press down and guide the insert (to keep it straight) as you remove tape. Do not press the top or bottom of the insert down until the center portion of the insert is stuck.
8. Once down, firmly press the entire insert into the embellisher.
9. Wipe all down and reinstall on bike, you are through!
10. Treat the new insert with care as they are fresh out of the mold, very soft (thus flexible), and susceptible to scarring until they fully cure.
THIS WORKED FOR ME, NOT RESPONSIBLE IF IT DOES NOT WORK FOR YOU!
Last edited: