2008 classic thermostat question

Spacely

Standard Bore
Joined
Aug 14, 2025
Messages
7
Ride
2008 Triumph Rocket 3
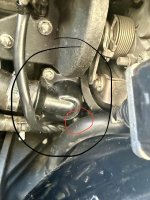
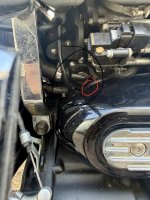
I’m about to try to change the thermostat on a 2008 rocket III classic. I tried to previously without removing anything else, but it’s leaking so now I need to figure out what’s the least amount of things I have to remove to be able to get to the thermostat easily enough. I tried to loosen the oil tank to get it out of the way, but the throttle assembly is in the way of the oil tank. Do I have to remove all of that just to get the thermostat out?

Update: I was able to bet to it by draining the oil and disconnecting the hose covering the bottom bolt. It's still overheating so I'm checking the water pump tomorrow.
 
Last edited:

Step-by-Step Removal Instructions​


The thermostat on the 2008 Triumph Rocket III Classic is located in the thermostat housing at the top front of the engine, near the cylinder head. It's a standard wax-pellet type that opens around 82–85°C (180–185°F). Removing it requires draining the coolant first. These steps are based on the official service manual procedures for the Rocket III series (applicable to 2004–2013 models, including the 2008 Classic).


  1. Prepare the Motorcycle:
    • Park on a level surface and let the engine cool completely (at least 2–3 hours after riding).
    • Remove the rider's seat for better access (see page 17-17 of the service manual: lift the seat latch under the side cover and pull up).
  2. Drain the Coolant:
    • Place a drain pan under the radiator (right side of the bike).
    • Open the radiator drain tap (bottom of the radiator) and remove the radiator cap slowly to relieve pressure.
    • Drain all coolant into the pan. Close the drain tap once empty.
    • Also loosen the water pump drain plug if needed (tighten to 10 Nm when done).
  3. Disconnect the Hoses:
    • Locate the thermostat housing on the top right of the engine (near the radiator top hose).
    • Loosen the hose clamps on the top radiator hose and the bypass hose (connected to the cylinder head).
    • Gently twist and pull the hoses off the thermostat housing barbs. Expect some residual coolant—have rags ready.
    • If clamps are screw-type, use a screwdriver; if spring-type, use pliers.
  4. Remove the Thermostat Housing:
    • Remove the two bolts securing the thermostat housing to the cylinder head (typically 10mm sockets; torque spec for reinstall is 10–12 Nm).
    • Carefully lift off the housing. The thermostat sits inside, sealed with an O-ring or gasket—note its orientation (jiggle valve up).
  5. Extract the Thermostat:
    • The thermostat may pop out with the housing or stick inside the head. If stuck, gently pry it out with a flathead screwdriver—avoid damaging the mating surfaces.
    • Inspect the old thermostat: Test it in boiling water (it should open at ~82°C). Clean the housing and head of old gasket material.

Reinstallation (If Replacing)​


  • Install a new thermostat (OEM part T3050301 or equivalent) with the correct orientation.
  • Fit a new O-ring/gasket to the housing.
  • Reattach the housing, torque bolts to 10 Nm.
  • Reconnect hoses and tighten clamps securely.
  • Refill with coolant: Open the bleed screw on the thermostat housing, slowly add coolant to the radiator until full, then top off the expansion tank. Close the bleed screw when coolant flows out steadily (no air bubbles).
  • Run the engine to operating temperature, check for leaks, and top off coolant as needed. Bleed air by idling until the fan cycles.
It is near impossible to get to the thermostat housing without removing or at least loosening the oil tank but the throttle assembly is in the way of the bolt.
 
It is near impossible to get to the thermostat housing without removing or at least loosening the oil tank but the throttle assembly is in the way of the bolt.
My manual does not address the oil tank or fuel rail as to removal/installation. Could you take a picture of the problem area. There are only 2 bolts that hold the thermostat cap and the coolant hoses that are attached to the housing don't have to be removed to pull the cap off. One other note per the manual is the jiggle pin on the thermostat has to be at the twelce o'clock position and the thermostat seated in the recess. Also did you buy a new O-ring to refit the cap?
 

My manual does not address the oil tank or fuel rail as to removal/installation. Could you take a picture of the problem area. There are only 2 bolts that hold the thermostat cap and the coolant hoses that are attached to the housing don't have to be removed to pull the cap off. One other note per the manual is the jiggle pin on the thermostat has to be at the twelce o'clock position and the thermostat seated in the recess. Also did you buy a new O-ring to refit the cap?
I received the right thermostat with the wrong O-ring so on my first try, I did it with the old O-ring. It took three hours to remove the bottom bolt an eighth of a turn at a time if I could get the wrench at the right angle to engage with the bolt. The problem is that hose coming from the oil tank being in the way. It took over three hours to get that bottom bolt back in. As soon as I filled the radiator the thermostat housing began to leak. I know it’s because of the old O-ring. I have a new one now I’m just looking for a easier way to access the thermostat housing
 
I received the right thermostat with the wrong O-ring so on my first try, I did it with the old O-ring. It took three hours to remove the bottom bolt an eighth of a turn at a time if I could get the wrench at the right angle to engage with the bolt. The problem is that hose coming from the oil tank being in the way. It took over three hours to get that bottom bolt back in. As soon as I filled the radiator the thermostat housing began to leak. I know it’s because of the old O-ring. I have a new one now I’m just looking for a easier way to access the thermostat housing
 

Attachments

  • IMG_0244.jpeg
    IMG_0244.jpeg
    185.2 KB · Views: 18
  • IMG_0248.jpeg
    IMG_0248.jpeg
    198.7 KB · Views: 24
  • IMG_0250.jpeg
    IMG_0250.jpeg
    163 KB · Views: 20
OK, I see your issue. To remove the oil tank you must first remove the throttle bodies because you have to pull UP on the oil tank to remove it. You also have to drain the oil tank from the sump plug. So ask yourself if you'll be saving any time by doing that over just suffering with the bottom bolt beig hard to get to. If you want the step by step to remove the TBs and oil tank I have the shop manual or you can ask an AI like GROK. The only advantage of removing that stuff would be getting a proper torque to the housing bolts.
 
OK, I see your issue. To remove the oil tank you must first remove the throttle bodies because you have to pull UP on the oil tank to remove it. So ask yourself if you'll be saving any time by doing that over just suffering with the bottom bolt beig hard to get to. If you want the step by step to remove the TBs and oil tank I have the shop manual or you can ask an AI like GROK. The only advantage of removing that stuff would be getting a proper torque to the housing bolts.
When considering everything that it would take to remove those parts, it does seem easier to just struggle through that bottom bolt. I was just reviewing all my options. Thank you for the advice and help.
 
When considering everything that it would take to remove those parts, it does seem easier to just struggle through that bottom bolt. I was just reviewing all my options. Thank you for the advice and help.
I wish I had the option to take it into a triumph dealer, but living in New Orleans the closest one is in Houston. That's at least five hours. Not worth it.
 
Glad to be of assistance. I kept my shop manual when I traded my 05 Rocket, so if you need help from the book just ask. (Oddly enough I have the shop manual for my 2023 GT in both paper and PDF).
 
Back
Top