2012 Roadster Handling

"Taking the head lights off will give you the room to remove the risers, just happens I have to do the same. Mines previous owner has fitted Tourer risers and I need to source some early risers.."
Thanks Bunny. I'll have a go tomorrow. The guy I bought the bike from had the 3" risers fitted at a local "workshop", but included the OEM units in the sale, so can't help with sourcing unless you want the 3" ones I'll be taking off.
I uploaded the Roadster Supplement to Resources some time ago (page 1). The full manual used to be there too. If you search on this site you'll find someone who has the link to that. If I remember the manual would specify differences for the models when applicable.
I've just found a better copy of the manual, from a 2008 link by another forum user. I've sent him a message and if he's happy I'll post either the link or my downloaded copy in Resources. The manual still shows the same errors I mentioned, so I'll detail them too.
 
Last edited:
so can't help with sourcing unless you want the 3" ones I'll be taking off.
Don’t think so 😂. When I got mine it also had a set of Touring bars fitted as well as the risers. The front brake pipe was stretched tight as a guitar string, so had to replace that as well.
Don’t know if you know, but the early clocks would swivel forwards on a hinge for maintenance.
 
Don’t think so 😂. When I got mine it also had a set of Touring bars fitted as well as the risers. The front brake pipe was stretched tight as a guitar string, so had to replace that as well.
Don’t know if you know, but the early clocks would swivel forwards on a hinge for maintenance.
One of the reasons I'm changing mine too, at full right lock I noticed the brake line stretching tight across the plastic thingy behind the headstock. Another benefit of using local workshops...... Plus the way it's mounted blocks lifting the tank.

I saw the clock tilting somewhere else too, but don't see how mine can tilt.
Previous owner probably replaced the lot, as the hinged bit is part of top clamps.
 
Previous owner probably replaced the lot, as the hinged bit is part of top clamps.
Actually, I think it's only the earlier bikes that had it. I think I saw a difference in the manual from certain VINs onwards. The buffoons who fitted these risers had to use the original top clamps 'cos of the clock fitting, looks crap.

Hit a bump refitting the originals, missing a single M10 nut. Round here that means I need to ship it in: 4 nuts cost AED25, plus AED99 for shipping. This is why I'd rather NOT change a tyre, can't remember how much the set for the Harley cost but shipping them was eye-watering.
My first one was a 2004, so that adds up. Going to try and find a set coz it’s dead handy just rolling the clocks forward. Have you tried Just Rockets for any parts you want, they’re in Wisbech.
 
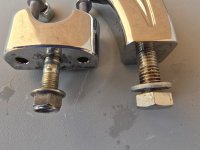
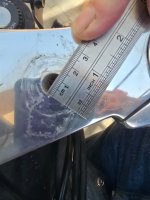
OK, I finally got the 3" risers off. It took the full lexicon of English curse words, plus a selection of German and Creole. The pics below show what these "technicians" from the local shop managed; I had to use my pipe wrench to gat the b$%tards moving, no way a 19mm socket/spanner or anything else was gonna fit in that gap, and helpfully they'd also loctited the threads. (Yes, the liquid around them is sweat). OEM mounts shown on the left.

I have a strong suspicion these buffoons also drilled out the yoke to fit the construction-grade bolt, the OEM shafts are very loose, does anybody know what size the riser mounting bolt holes are supposed to be in the yoke?

1760606480582.jpeg 1760606287333.jpeg
 
Last edited:
OK, I finally got the 3" risers off. It took the full lexicon of English curse words, plus a selection of German and Creole. The pics below show what these "technicians" from the local shop managed; I had to use my pipe wrench to gat the b$%tards moving, no way a 19mm socket/spanner or anything else was gonna fit in that gap, and helpfully they'd also loctited the threads. (Yes, the liquid around them is sweat). OEM mounts shown on the left.

I have a strong suspicion these buffoons also drilled out the yoke to fit the construction-grade bolt, the OEM shafts are very loose, does anybody know what size the riser mounting bolt holes are supposed to be in the yoke?

1760606480582.jpeg 1760606287333.jpeg
That’s a Harley riser they’ve fitted there, that looks imperial to me! What size spanner fits that nut head on, looks to be 1/2”AF (13ish in metric).
If it’s that slack in the hole, I’d make a sleeve to go in. Alternatively, is there anyone local who could drill and tap the standard riser to take a bolt that’ll match the new hole?
It probably is a Harley set. The bolts holding them needed a 19mm metric socket - the problem was there was not enough room between the bolt head and other "stuff" to get the socket around the bolt. I had to get my pipe wrench on the riser itself to get the whole thing spinning, then jam my biggest flathead screwdriver between a bolt face and the yoke, then graunch it off. The OEM riser nut needed a 14mm socket, which fits easily. I didn't use a sleeve, just evened the position then torqued it up to PFT, seems to be working.

Like I said earlier but after a much longer test ride, the odd handling is still there, but manageable. I suspect Journeyman's right about the uneven wear and the next step will be to arrange a 2nd mortgage and change the tyres.

JHortz - let us know how you get on with yours?
 
Back
Top