REPLACE OIL SEAL INPUT SHFT BEVEL BOX
1 remove plastic cover with 4 M6 bolts.
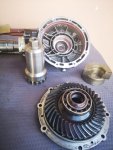
2 remove 8 M8 bolts from the final drive to open it.
3 screw the 4 M6 bolts of the cover back into the cover. Lightly tap the 4 bolts of the cover with a screwdriver to open the cover of the final transmission.
4 remove the cover with the bearings and gears.
5 Now remove the locking plate from the input shaft and mark it with a dot where it is to secure it back in the same position.
6 secure the house on a table, turn the input shaft out of the house this is a right-hand thread with the self-made special key, this is fairly fixed.
7 Now take the press tool and place it around the coupling and weld the two halves of the press tool together with two small welds, place the tool under a press support only on the tool, now press the shaft out of the coupling.
8 remove the circlips, remove the oil seal, if there is no damage to the bearings I would leave them on because they are tightened at the moment.
9 place the new oil seal push it until just before the end of the groove of the circlips, place the circlips now tap on the circlips until it jumps into the groove, be careful you can put the oil seal too deep it must be just below the circlips.
10 place the coupling back on the toothing and tap it with a rubber hammer a bit on the toothing put it under a press and press it into place against the collar.
11 place the output shaft back in the final drive and turn it back in with the special key to the same place as it stood, until the marking you made disassemble it, assemble the lock nut with lock fluid.
12 assemble the cover with the sealing kit and secure it with the bolts.

")