Allan S
Simple African lad with a Rocket
Well, the spate of minus F***k-off weather we just had has forced me to finish my list of winter projects early. She’s all detailed and cleaned up now waiting under her cover for spring- which seems a million years off still.
At the end of last season I had her serviced and decided to change tires to the higher profile Excedra Max at the back and lower profile Avon in the front. I found that the change automatically fixed the +/- 5% speedometer reading error I had noticed when comparing my GPS speed. I had no ABS issues either.
At the same time I changed the front fork springs for progressives and heavier oil, and put a pair of Hagon Nitros on the back. The tires and suspension mods made a fantastic improvement to the overall feel and cornering confidence factor of the bike and I was more than satisfied with the results. You really can follow the great advice you get on this forum.
I only got to go one 400 km ride after the service and tire/suspension changes were done before I ran into a stalling /won’t start issue that necessitated the changing of the wiring harness and ECU which seems to have cured the issue. By the time the problem was fixed the season was over and the snow was flying, but the help offered by members especially Warp is much appreciated.
Needing a fix of “bike Time” I embarked on a couple of small projects to improve the old girl. I chose them based on what I read on this forum and from the experience I had gained riding her over last season.
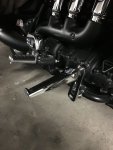
I put a set of Rivco Goldwing highway peg mounts onto the foot peg rails as I had seen a fellow forum member do and it worked out great. Plenty of clearance between the brake and shifter pedals because of the length of the mounts and they are rock solid, no slipping or turning like the previous Kuryakin ones that I had tried that not only turned when you put weight on them but they were too short to give proper clearance to the brake and shifter and so felt cramped.
I remember feeling a bit embarrassed by the roadrunner “meep-meeep” of my horn during the season and decided to install a more suitable horn for a bike of this size and presence. I decided on a Screaming Banshee horn even though it was on the pricier end of available horns, mostly because it is stupid loud and has the controller etc built into a single relatively compact unit.
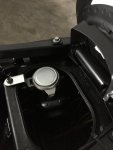
I had removed the air box ducting ready for the Ramair that I bought from Ita 01 on this forum so I installed the banshee into the old air box and ran the wiring out through the duct that used to carry air to the plenum. Easy job and it works beautifully. Crazy loud and it alternates between a loud and louder horn while still keeping the “MEEEEP” of the stock horn for added clamor. The Banshee comes with a single wire connection option to attach it to your high beam that will cause it to either strobe ( like a cop) or flash , depending on what you choose. I didn’t want to mess with my high beam wiring as there are two headlamps so bought a mounting bracket an off-road LED spotlight on Amazon and mounted that below my horn embellisher and wired that to the Banshee so that it flashes when the HORN sounds. Its almost offensively loud and with the flashing LED spotlight you could never fail to notice me if I honked at you! Job accomplished.
The Ramair arrived and I installed it following the popular YouTube video. There are a couple of hints to note. Firstly there is no longer a rubber spacer for the sensor when you relocate it to the Ramair body. There is now a thin rubber skin that you slit and push the sensor through to snug fit. It’s not in the included instructions and is different to the older version used in the video. Also, the clamps above the engine that mount the ducting to the plenum that feeds the throttle bodies is really as difficult to get at as the video warns. If you release everything else and remove the plenum on the throttle body side, then gently but firmly wiggle the plenum from that side, you can easily remove it as there are rubber joints that are being held on by those infamous clamps that bend and give. Once the plenum is loose the clamps can just be pulled off and the rubber connectors slide out easily.
I installed a Dave Platt Crossover pipe as well. Truly simple 4 bolt process that took 20 minutes.
So now I had a Ramair and crossover feeding my Dave Platt mufflers I needed a decent Map for it. I was really a bit intimidated to use Tune ECU, but after a bit of explanation by Hanso, and reading the online manual carefully I decided I could do this. I ordered the cable from Lonelec ignoring other sources as this forum has had only good things to report on the Lonelec one that is cheap enough anyway. I followed the instructions on the TuneEcu site for getting the right driver installed and had no problem getting the ECU to talk to my trusty laptop. Copied the current Map, uploaded The new Map from Hanso and did a full 12 minute tune per instruction from Ulf Penner whose awesome video on “tuning basics” and proper adaption on this forum makes a lot of hazy info very clear. When the weather improves I will also try the map that Ulf made available on Tune Ecu site with a link in the forum article which looks to give significant improvements based on the Dyno in his video.
I wanted to make my Rocket look more “athletic” and “lean and mean” in keeping with its handling and power improvements. I had removed the indicators earlier in the year and put LEDs behind my windshield and on the rear number plate but I was never really happy with the result. It looked good but wasn’t as impactful as I’d have liked. I decided to get some from fork ring LED indicators from 360 Rage which snap onto the forks and wire to the existing signal wires easily enough.
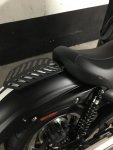
I got a “fender eliminator” from Chrome Glow for the rear. It’s not really a fender eliminator as all it eliminates is the entire number plate holder/ plate light/rear indicator assemblies. It comes with instructions to remove the rear mudguard and wiring harness to the right side flasher unit that I didn’t want to do, so I just worked under the bike to remove the brackets that held the plate and indicators ( 4 nuts- easy, if cramped) and kept the wiring harness to the flasher and just wired the indicators in the eliminator according to the diagram. Also much easier than taking everything out and putting it back. Works perfectly and gives clean uncluttered look to the rear of the bike.
With all that done I had run out of things to occupy myself with so I decided to cut the bearclaw for the Ramair. Not to give more air as I believe that plenty air gets in there from everywhere very easily but simply cause I was bored and wanted it to look better.
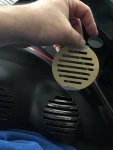
I decided to cut strips to create a circle effect and fit stainless mesh behind that just to look badass. After the cutting the bearclaw was so scuffed and scratched, even though I had powder coated it previously, that I decided to wrap it in 3M carbon fiber Dinoc on the lower half and plain satin/ matte black on top. I did the layout drawing in AutoCad and took it to my local laser cutting shop for initial cutting. It came out quite well but I wouldn’t want to do it again. Thick tin on that thing that gets sharp when you cut it.
Well its nearly the end of January with at least 2 and a half more months of winter to go until I can try out all my handiwork but I’m done. The feeling of satisfaction one gets from working on your bike yourself is tremendous! However without the help and advice of the amazing members of this forum group I don’t think I would’ve tried most of it. Thank you to all of you whether you helped me directly or just shared useful advice on the forum that made the winter for this poor frozen scmuck stuck in an icy wasteland a little more bearable.
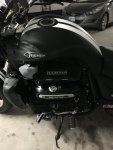
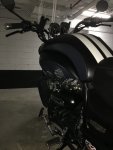
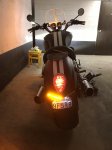
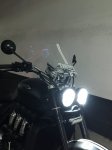
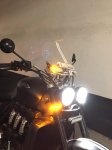

I’ve attached some pictures for those who are interested.
At the end of last season I had her serviced and decided to change tires to the higher profile Excedra Max at the back and lower profile Avon in the front. I found that the change automatically fixed the +/- 5% speedometer reading error I had noticed when comparing my GPS speed. I had no ABS issues either.
At the same time I changed the front fork springs for progressives and heavier oil, and put a pair of Hagon Nitros on the back. The tires and suspension mods made a fantastic improvement to the overall feel and cornering confidence factor of the bike and I was more than satisfied with the results. You really can follow the great advice you get on this forum.
I only got to go one 400 km ride after the service and tire/suspension changes were done before I ran into a stalling /won’t start issue that necessitated the changing of the wiring harness and ECU which seems to have cured the issue. By the time the problem was fixed the season was over and the snow was flying, but the help offered by members especially Warp is much appreciated.
Needing a fix of “bike Time” I embarked on a couple of small projects to improve the old girl. I chose them based on what I read on this forum and from the experience I had gained riding her over last season.
I put a set of Rivco Goldwing highway peg mounts onto the foot peg rails as I had seen a fellow forum member do and it worked out great. Plenty of clearance between the brake and shifter pedals because of the length of the mounts and they are rock solid, no slipping or turning like the previous Kuryakin ones that I had tried that not only turned when you put weight on them but they were too short to give proper clearance to the brake and shifter and so felt cramped.
I remember feeling a bit embarrassed by the roadrunner “meep-meeep” of my horn during the season and decided to install a more suitable horn for a bike of this size and presence. I decided on a Screaming Banshee horn even though it was on the pricier end of available horns, mostly because it is stupid loud and has the controller etc built into a single relatively compact unit.
I had removed the air box ducting ready for the Ramair that I bought from Ita 01 on this forum so I installed the banshee into the old air box and ran the wiring out through the duct that used to carry air to the plenum. Easy job and it works beautifully. Crazy loud and it alternates between a loud and louder horn while still keeping the “MEEEEP” of the stock horn for added clamor. The Banshee comes with a single wire connection option to attach it to your high beam that will cause it to either strobe ( like a cop) or flash , depending on what you choose. I didn’t want to mess with my high beam wiring as there are two headlamps so bought a mounting bracket an off-road LED spotlight on Amazon and mounted that below my horn embellisher and wired that to the Banshee so that it flashes when the HORN sounds. Its almost offensively loud and with the flashing LED spotlight you could never fail to notice me if I honked at you! Job accomplished.
The Ramair arrived and I installed it following the popular YouTube video. There are a couple of hints to note. Firstly there is no longer a rubber spacer for the sensor when you relocate it to the Ramair body. There is now a thin rubber skin that you slit and push the sensor through to snug fit. It’s not in the included instructions and is different to the older version used in the video. Also, the clamps above the engine that mount the ducting to the plenum that feeds the throttle bodies is really as difficult to get at as the video warns. If you release everything else and remove the plenum on the throttle body side, then gently but firmly wiggle the plenum from that side, you can easily remove it as there are rubber joints that are being held on by those infamous clamps that bend and give. Once the plenum is loose the clamps can just be pulled off and the rubber connectors slide out easily.
I installed a Dave Platt Crossover pipe as well. Truly simple 4 bolt process that took 20 minutes.
So now I had a Ramair and crossover feeding my Dave Platt mufflers I needed a decent Map for it. I was really a bit intimidated to use Tune ECU, but after a bit of explanation by Hanso, and reading the online manual carefully I decided I could do this. I ordered the cable from Lonelec ignoring other sources as this forum has had only good things to report on the Lonelec one that is cheap enough anyway. I followed the instructions on the TuneEcu site for getting the right driver installed and had no problem getting the ECU to talk to my trusty laptop. Copied the current Map, uploaded The new Map from Hanso and did a full 12 minute tune per instruction from Ulf Penner whose awesome video on “tuning basics” and proper adaption on this forum makes a lot of hazy info very clear. When the weather improves I will also try the map that Ulf made available on Tune Ecu site with a link in the forum article which looks to give significant improvements based on the Dyno in his video.
I wanted to make my Rocket look more “athletic” and “lean and mean” in keeping with its handling and power improvements. I had removed the indicators earlier in the year and put LEDs behind my windshield and on the rear number plate but I was never really happy with the result. It looked good but wasn’t as impactful as I’d have liked. I decided to get some from fork ring LED indicators from 360 Rage which snap onto the forks and wire to the existing signal wires easily enough.
I got a “fender eliminator” from Chrome Glow for the rear. It’s not really a fender eliminator as all it eliminates is the entire number plate holder/ plate light/rear indicator assemblies. It comes with instructions to remove the rear mudguard and wiring harness to the right side flasher unit that I didn’t want to do, so I just worked under the bike to remove the brackets that held the plate and indicators ( 4 nuts- easy, if cramped) and kept the wiring harness to the flasher and just wired the indicators in the eliminator according to the diagram. Also much easier than taking everything out and putting it back. Works perfectly and gives clean uncluttered look to the rear of the bike.
With all that done I had run out of things to occupy myself with so I decided to cut the bearclaw for the Ramair. Not to give more air as I believe that plenty air gets in there from everywhere very easily but simply cause I was bored and wanted it to look better.
I decided to cut strips to create a circle effect and fit stainless mesh behind that just to look badass. After the cutting the bearclaw was so scuffed and scratched, even though I had powder coated it previously, that I decided to wrap it in 3M carbon fiber Dinoc on the lower half and plain satin/ matte black on top. I did the layout drawing in AutoCad and took it to my local laser cutting shop for initial cutting. It came out quite well but I wouldn’t want to do it again. Thick tin on that thing that gets sharp when you cut it.
Well its nearly the end of January with at least 2 and a half more months of winter to go until I can try out all my handiwork but I’m done. The feeling of satisfaction one gets from working on your bike yourself is tremendous! However without the help and advice of the amazing members of this forum group I don’t think I would’ve tried most of it. Thank you to all of you whether you helped me directly or just shared useful advice on the forum that made the winter for this poor frozen scmuck stuck in an icy wasteland a little more bearable.


I’ve attached some pictures for those who are interested.


