Bedifferent
Old man on a bike
I am revisiting the SH847AA series regulator/rectifier mount that I made. I posted some information elsewhere in the forum, but I have revised some things.
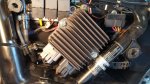
I have fabricated several jigs and fixtures that will allow me to duplicate the mount I made. It will fasten the new R/R securely behind the left infill panel. I fits my 2015 R3T ABS nicely, utilizing a screw located on the air box and the frame for mounting. If your relay bracket, screw and frame match my pictures, it should work if you are interested.
I decided to modify the backing plate I used and not include the ears (as shown in one of the pictures). This helps save time using a my band saw to cut the backing plates. I made up a set of instructions as well to help keep the install simple. FYI...I did not bother to remove the stock R/R as...what is the point. I chose to rather to just cap of the connectors. A big thanks to @DEcosse for putting me on to the right connectors to use.
I am not pushing a product here, but trying to help out with a mount you can use if you can't make your own. I will be just as happy if I don't make any more, but at least I can if needed.
Now for the down side. I will not spend time and money making them for super cheap. When I factor in wear and tear... sanding belts, blades, materials, driving around to get the material, nuts, bolts, and my labor making all the parts, I have come to the conclusion I will not make and ship them for less than $35. $7.20 of which is just for shipping.
If you can't make a good mount for your new $155.00 R/R, this is a ready made solution. Feel free to copy and make your own if you like. This mount is rock solid.
Pictured:
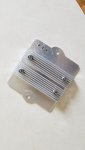
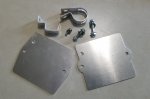
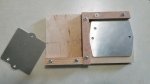
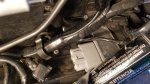
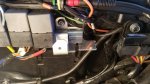
The mount with all the included parts (I have a couple made with the ears on them), my jigs and fixtures for making them, the mounted R/R, the capped stock regulator, the airbox mounting bracket screw and relay bracket on my bike, old and newer mounting plate and the mounted SH847AA.
I have fabricated several jigs and fixtures that will allow me to duplicate the mount I made. It will fasten the new R/R securely behind the left infill panel. I fits my 2015 R3T ABS nicely, utilizing a screw located on the air box and the frame for mounting. If your relay bracket, screw and frame match my pictures, it should work if you are interested.
I decided to modify the backing plate I used and not include the ears (as shown in one of the pictures). This helps save time using a my band saw to cut the backing plates. I made up a set of instructions as well to help keep the install simple. FYI...I did not bother to remove the stock R/R as...what is the point. I chose to rather to just cap of the connectors. A big thanks to @DEcosse for putting me on to the right connectors to use.
I am not pushing a product here, but trying to help out with a mount you can use if you can't make your own. I will be just as happy if I don't make any more, but at least I can if needed.
Now for the down side. I will not spend time and money making them for super cheap. When I factor in wear and tear... sanding belts, blades, materials, driving around to get the material, nuts, bolts, and my labor making all the parts, I have come to the conclusion I will not make and ship them for less than $35. $7.20 of which is just for shipping.
If you can't make a good mount for your new $155.00 R/R, this is a ready made solution. Feel free to copy and make your own if you like. This mount is rock solid.
Pictured:
The mount with all the included parts (I have a couple made with the ears on them), my jigs and fixtures for making them, the mounted R/R, the capped stock regulator, the airbox mounting bracket screw and relay bracket on my bike, old and newer mounting plate and the mounted SH847AA.
Attachments
-
 20180528_180040.jpg172.6 KB · Views: 76
 -
 20180528_175156.jpg134.3 KB · Views: 72
 -
 20180528_175002.jpg133.6 KB · Views: 77
 -
 20180528_130347.jpg199.2 KB · Views: 80
 -
 20180515_154608.jpg179.1 KB · Views: 78
 -
 20180528_125052.jpg215.2 KB · Views: 75
 -
 20180525_125814.jpg114.3 KB · Views: 73
 -
 20180528_125114.jpg167 KB · Views: 73