Here's an update to the process and an issue that you should be aware of. The first time may be a bit of a hassle, but if you ignore lubing the splines you will regret it later. This may go long...
It's really interesting that the need to lube the splines is not on the scheduled maintenance table. It has to be done periodically. You can see on my bike where after 8,000 miles the grease is drying out and what's left is getting pretty thin. Look the subject up on the 2.3 Rocket threads- the 2.5s are not exempt.
On page 1260 of the service manual it states, "If a stud fitted to the rear bevel box becomes loose when the fixings are removed, a new stud must be fitted."
I'm shocked to see that they are actually reasonably priced
Stud, M12, Enc, Slv T3201277(Current price) $ 3.74
and so, you may want to go this route, but be prepared for "not in stock" and the down time, unless you plan well in advance.
What I've found is that
anytime/
everytime Triumph mentions removing a bolt with lockite on it they say you need to replace it. The replacements have loctite applied. But, is the bolt actually bad because you loosened and re-torqued it? I think not.
Three of the four bolts on my final drive backed out along with the cap nuts. Why? The cap nuts have a stronger thread lock compound and that causes the bolts to back out.
Here's what I did:
- Once out, remove the dried loctite from the bolts. There are two different threads on these 12M bolts. The rough thread goes into the final drive and the 1.25 pitch is what the cap nuts go onto.
- The rough thread has blue loctite on it. Wire brush it, use isopropyl alcohol, and maybe a pick to remove- pretty easy.
- Removing the cap nuts from the studs was a PITA. It took a good bit of force - I should have used some heat to weaken the compound. The fine thread has some more serious compound on it.
- Strange, because the manual does not instruct you to reapply any kind of thread lock on those nuts- which I did not.
-
- Use two nuts of the appropriate size on each end of the studs to give you a grip for removing the cap nut and for reinstalling the studs into the final drive. Tightening the nuts hard against each other creates a wrench point with which to apply force without marring anything. For example, below, to remove the cap nuts.

- Once out, I soaked the nuts in alcohol and used a pick, carefully, to trace the threads to remove the compound.
-
- Apply blue Loctite to the rough threads and torque into the final drive. You'll want to use two nuts on the 1.25 pitch threads so your torque wrench can turn the studs. Torque to spec and according to sequence (see manual).

- Once you have the studs reinstalled and all threads clean, including the nuts....
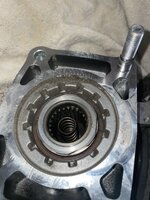
- Clean up the final drive and apply moly grease to the splines and internal mating surface of the final drive.
- Place the shaft in a straight out position with the spring balanced inside the shaft's opening.
- Make sure the two sleeves are on the studs, not sticking out of the mating surface with the shaft.
- Hold your mouth right and lift the drive onto the shaft. This is the hardest part. You need the spring to stay in place, the splines to line up with the female end on the FD, and then you need the studs to go into the four holes. You'll probably need to grab the shaft with your third hand to help position it so that it all lines up correctly. This is where an assistant is a Godsend, but I never have one and just do a lot of cursing and grunting.
- Finally, magically, after many attempts, the universe will align and the two ends will come together as lovers.
- Torque the nuts according to spec and sequence (see the manual).
- Next time you'll probably not have an issue with the studs and the procedure will be much, much, easier.
This is a great time to remove your brake pads, push the pistons out a bit and clean up everything brake related (with every tire change). I change the final drive fluid while I'm at it. Lubing the splines and changing the FD fluid is your best insurance against a very costly replacement down the line.