transmission noise!!

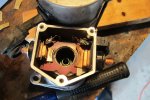
On the triumph Starter if you pull this plate you will see the electrical contact points which transfer power to drive the starter gear into the flywheel/ the two cables have copper contacts on it and what they contact you will see how they are ruff and might not transfer good power to the starter.(If they were like mine) so I cleaned and filed the contact areas smooth for better contact. Tomorrow I will open one up for a better picture to help you see what I mean. I will post them up. anyway you have time as you won't put the starter back in until you change the output drive. But its the contact assembly I noticed was ruff in mine your might or might not be but its only a couple bolts the check while you have it out.
 
yes kemosabe but if I am putting a new starter which I already bought the contacts SHOULD be clean and smooth alrady just saying!
 
yes kemosabe but if I am putting a new starter which I already bought the contacts SHOULD be clean and smooth alrady just saying!
Ah TonToe you are changing the starter motor not the complete starter. The contact under that plate stays with the rest of the OEM starter!!!!!
 
Last edited:
Ah TonToe you are changing the starter motor not the complete starter. The contact under that plate stays with the rest of the OEM starter!!!!!

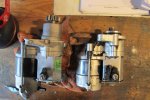
stand corrected !! I thought maybe just the bendix rod of the starter had to be changed I read somewhere that is what was to be replaced , but in fact it is the whole front assembly I presume as I look at the starters . also I checked the contacts found them corroded I think, "look at the pic what do you think" IMG_1188.JPG so used s IMG_1186.JPG ome fine sand paper and will put dielectric grease ,just a small film I also could not unscrew the front of the old starter my phillips screwdriver keeps popping out I will try a shop if not I will put the old starter back in I never felt the need for a stronger starter it is just that since it is all in the open I would upgrade to the 1.4 kw. will see if I can have the "head removed from the body "before returning the new one back to the store
 
stand corrected !! I thought maybe just the bendix rod of the starter had to be changed I read somewhere that is what was to be replaced , but in fact it is the whole front assembly I presume as I look at the starters . also I checked the contacts found them corroded I think, "look at the pic what do you think" IMG_1188.JPG so used s IMG_1186.JPG ome fine sand paper and will put dielectric grease ,just a small film I also could not unscrew the front of the old starter my phillips screwdriver keeps popping out I will try a shop if not I will put the old starter back in I never felt the need for a stronger starter it is just that since it is all in the open I would upgrade to the 1.4 kw. will see if I can have the "head removed from the body "before returning the new one back to the store
Yes the contacts in the second picture are what I was referring to. also if you look at the nest picture you will see what rides on the contacts. I clean mine up with a file. this picture is of the one that comes in the rebuilt starter. I was amazed how ruff it was. So considering the actual one in the Triumph starter was a wee bit ruff I used the file to clean it up hoping for more contact surface for the electricity. I am not sure if this will help some of the starter problems or not but figure it surely can't hurt. Some of the electrical guys on this site might be able to add to this for our knowledge. Now since you posted the stuff above I want to take the time to point out to you that you have more knowledge then your giving yourself credit for :)

P8230035.JPG


Once you figure out how to get them big Philips loose on the front post up some pictures of what you find in there so I can decide whether I should pull mine back out and do more work on it.
when you post you pictures click on the full image next to them. They have better resolution and view that way.
 
Last edited:
Do you have an impact driver for the Philips head screws? One of the best tools for dealing with stuck screws on motorcycles. One of the manual ones that you bang on the end with a hammer is all you need.

images
 
Do you have an impact driver for the Philips head screws? One of the best tools for dealing with stuck screws on motorcycles. One of the manual ones that you bang on the end with a hammer is all you need.

images
hey I have that same punch and probably paid $15 for it 10 years ago but it was no help I banged and banged . finally . I ended up drilling out the long screw ( using an extractor Icouldn't believe how easy it went for once )
now I have a 1.4 KW starter mounted with the "head"of the old one including the short bendix rod greased all the gears and roller bearing , applied dielectric grease on all contact reconnected the battery and Hit the starter ....nothing... my wife was looking on and said huhhh squeeze the clutch lever honey ! and I did the starter came to life wow!! I actually replaced and modified a piece of mechanical gear and it all works ..
I deserve a beer that full nelson organic beer from a small brewery in nelson 8 1/2 % alcool dark rrrefreshing and well
Yes the contacts in the second picture are what I was referring to. also if you look at the nest picture you will see what rides on the contacts. I clean mine up with a file. this picture is of the one that comes in the rebuilt starter. I was amazed how ruff it was. So considering the actual one in the Triumph starter was a wee bit ruff I used the file to clean it up hoping for more contact surface for the electricity. I am not sure if this will help some of the starter problems or not but figure it surely can't hurt. Some of the electrical guys on this site might be able to add to this for our knowledge. Now since you posted the stuff above I want to take the time to point out to you that you have more knowledge then your giving yourself credit for :)

P8230035.JPG


Once you figure out how to get them big Philips loose on the front post up some pictures of what you find in there so I can decide whether I should pull mine back out and do more work on it.
when you post you pictures click on the full image next to them. They have better resolution and view that way.

deserved! .

now I am looking at the cover of the output shaft and really wondering IF it could not be wiggled out without dropping the back of the engine. just saying because it looks like there is maybe some room although fred and jake must have thought the same and yet dropped the back of their engine in the end well I give myself two weeks for that job of replacing both bearing so if the virgin Mary is looking upon me with empathy by the 15th I could be riding again, also looks like the silver cover I received is very similar to the one currently mounted so maybe I just re use the black one
 
Yes the contacts in the second picture are what I was referring to. also if you look at the nest picture you will see what rides on the contacts. I clean mine up with a file. this picture is of the one that comes in the rebuilt starter. I was amazed how ruff it was. So considering the actual one in the Triumph starter was a wee bit ruff I used the file to clean it up hoping for more contact surface for the electricity. I am not sure if this will help some of the starter problems or not but figure it surely can't hurt. Some of the electrical guys on this site might be able to add to this for our knowledge. Now since you posted the stuff above I want to take the time to point out to you that you have more knowledge then your giving yourself credit for :)

P8230035.JPG


Once you figure out how to get them big Philips loose on the front post up some pictures of what you find in there so I can decide whether I should pull mine back out and do more work on it.
when you post you pictures click on the full image next to them. They have better resolution and view that way.

sorry I did not take pics of the rod and copper big washer but is was corroded just like the brushes I was not sure if I could use the new bendix rod and cut it to length except for the length all other dimensions were the same . I finally sanded down the old one to a shiny surface applied dielectric grease and repacked the "head onto the new motor. and remounted it to the engine and since I only get $10 for returning the core of the old one I think I will keep it just in case..
 
Back
Top